
Full Guide to build a Job Board website app with Nuxt, Storyblok and Nujek
This guide will help you build your scheme, frontend and connect everything together to build a simple job board website with Storyblok, Nuxt and Nujek Framework.
Table of Contents
Demo
1. Introduction
Personally, I prefer a hands-on guide where I can see the progress of the app I like to build. So, first let's prepare our workspace with the following tools:
- Nuxt.js
- NodeJS
- Yarn
- TailwindCSS
- Nujek framework
- Storyblok Account with a fresh space
2. Build the Storyblok Schema
We will need to create a new space on app.storyblok.com.
We're going to start building the Storyblok CMS scheme first. Then, we'll create stories based on the scheme and fill it with sample data, e.g. job posts.
My approach to explaining Storyblok to anyone is that I divide the needed steps into 3 pillars.
- Pillar I - Content Types (Blueprint)
- Pillar II - Components Bloks (Used by Content Types)
- Pillar III - Content Creation (Choose a Content Type and fill it with Component Bloks)
3. Pillar I - Understand Storyblok Content Types
With Content Types we define the schema for the content we later want to create. This is probably best explained with an example: Imagine two authors wanting to publish blog posts on their new blog website. Both of them agree on a set of fields as the underlying basis of how a blog post should look like.
Basically they will need a title, content and maybe an author field. The blueprint with these three fields will be used by both of the authors, each of them being aware of which fields they need to fill to publish this post. That's a content type. A defined schema of how our content will be built up.
3.1 Create the "Job" Content Type
On our job board we want to give the author the possibility to add several job listings to our final website. So, we need to prepare a scheme - a job content type for their Storyblok space.
To build this scheme do the following:
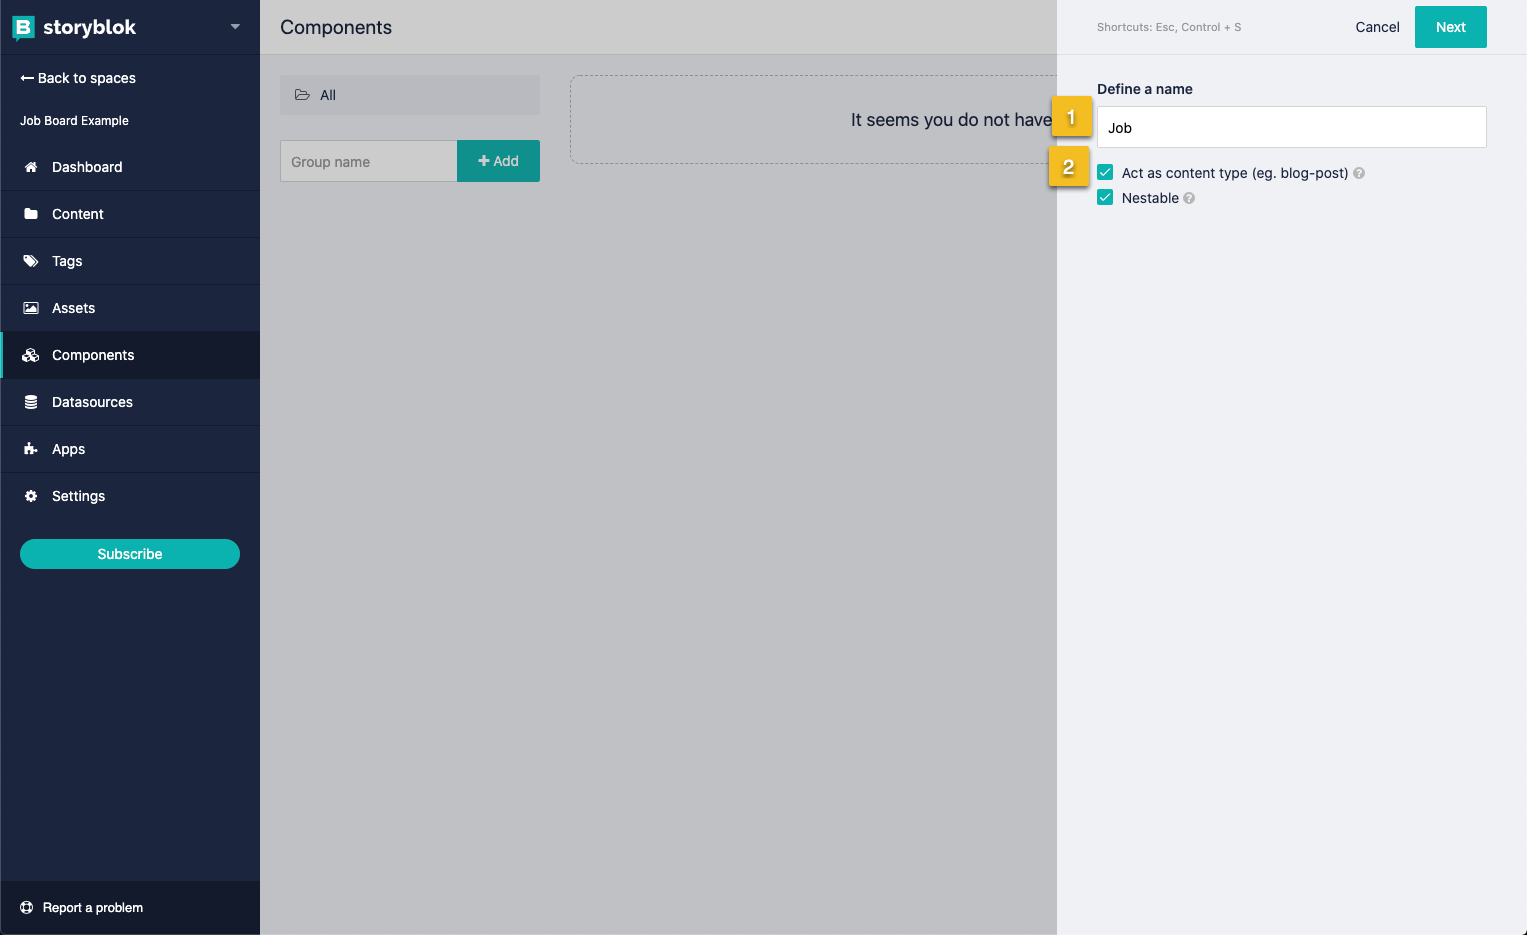
- Navigate to: Components -> New.
- {1} - Name: Job.
- {2} - Tick "Act as content type".
- Hit Next.
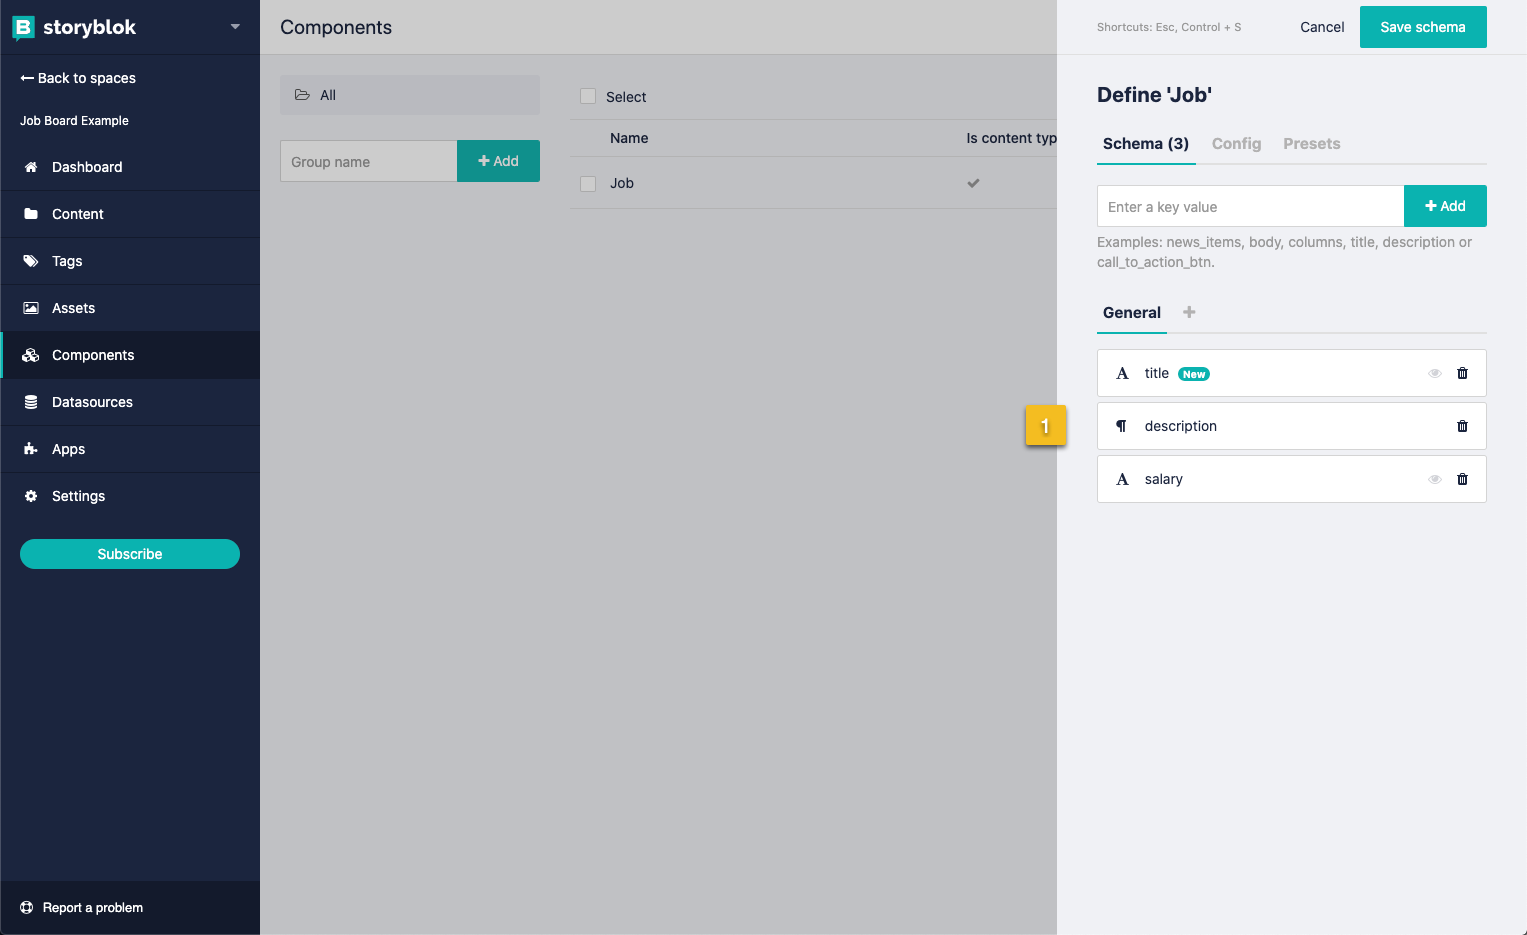
A typical job listing content type could contain the following fields:
- Job title | title | text
- Job Description | description | richtext
- Salary | salary | text
- ... and so on
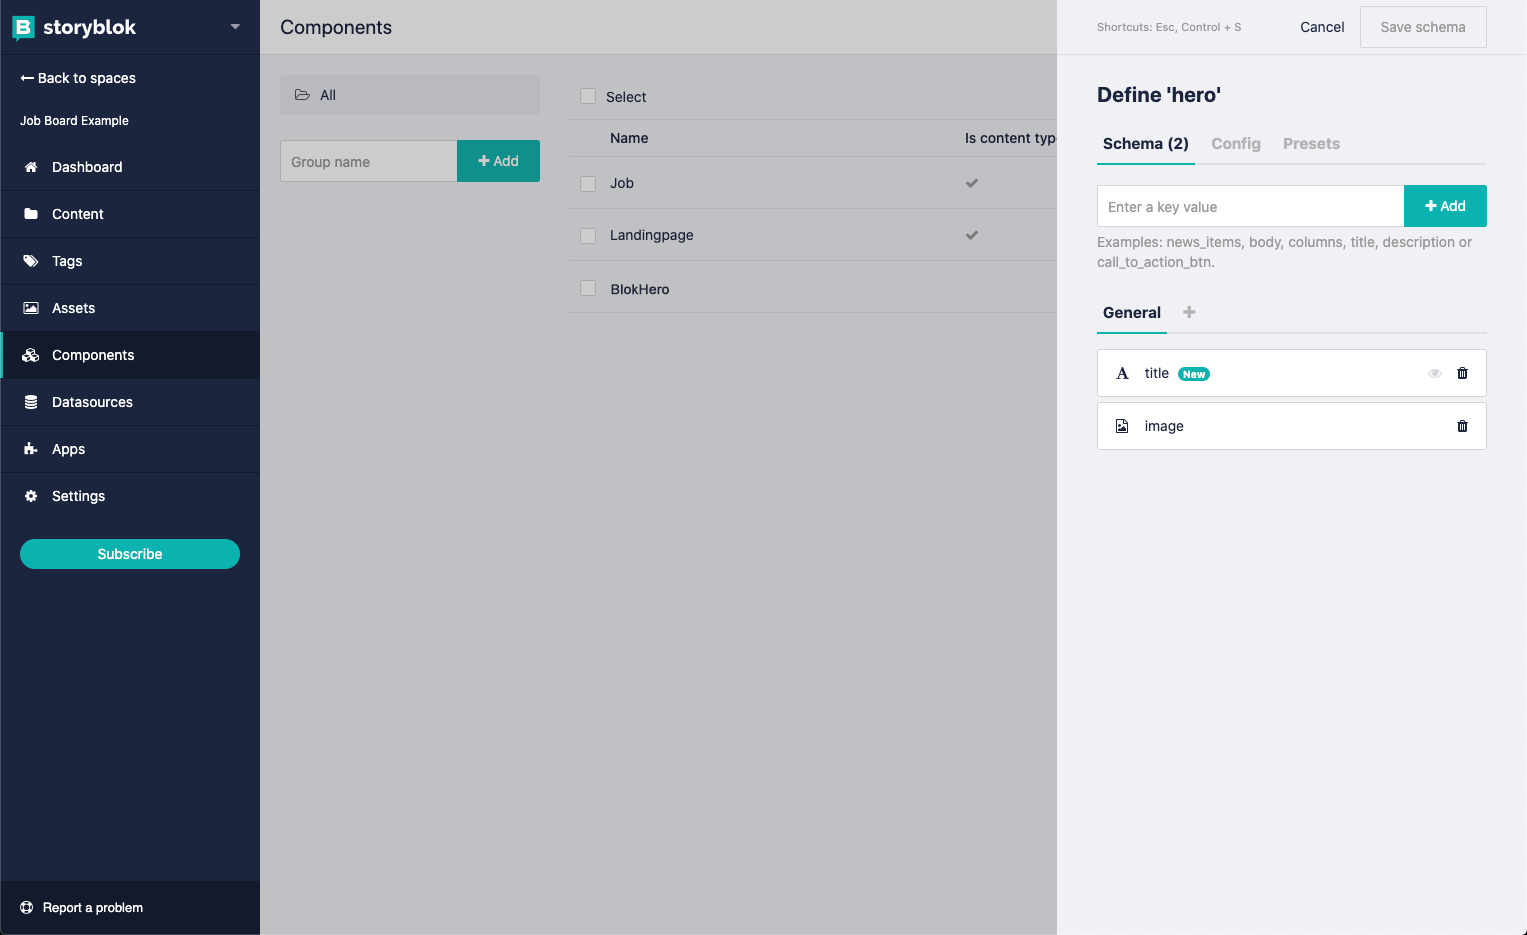
The next screen allows us to define the fields which are supported by the content type.
- {1} - Add 3 fields to it.
- Click Save schema
3.2 Create a "flexible" Default Content Type
Since we have removed all default content types from the demo space (if not yet, we can still do that), we are going to create a new content type which will act as our base Landingpage type.
With this special content type we will introduce the "Blocks" field which allows us to add and order flexible Website Sections to each of our pages. The landingpage content will be widely used and is located on the frontpage.
As you probably already know - Storyblok offers this great visual block based editor which makes website and landingpage building very flexible and scaleable. To achieve this, we'll absolutely need a "Blocks" field on the content type.
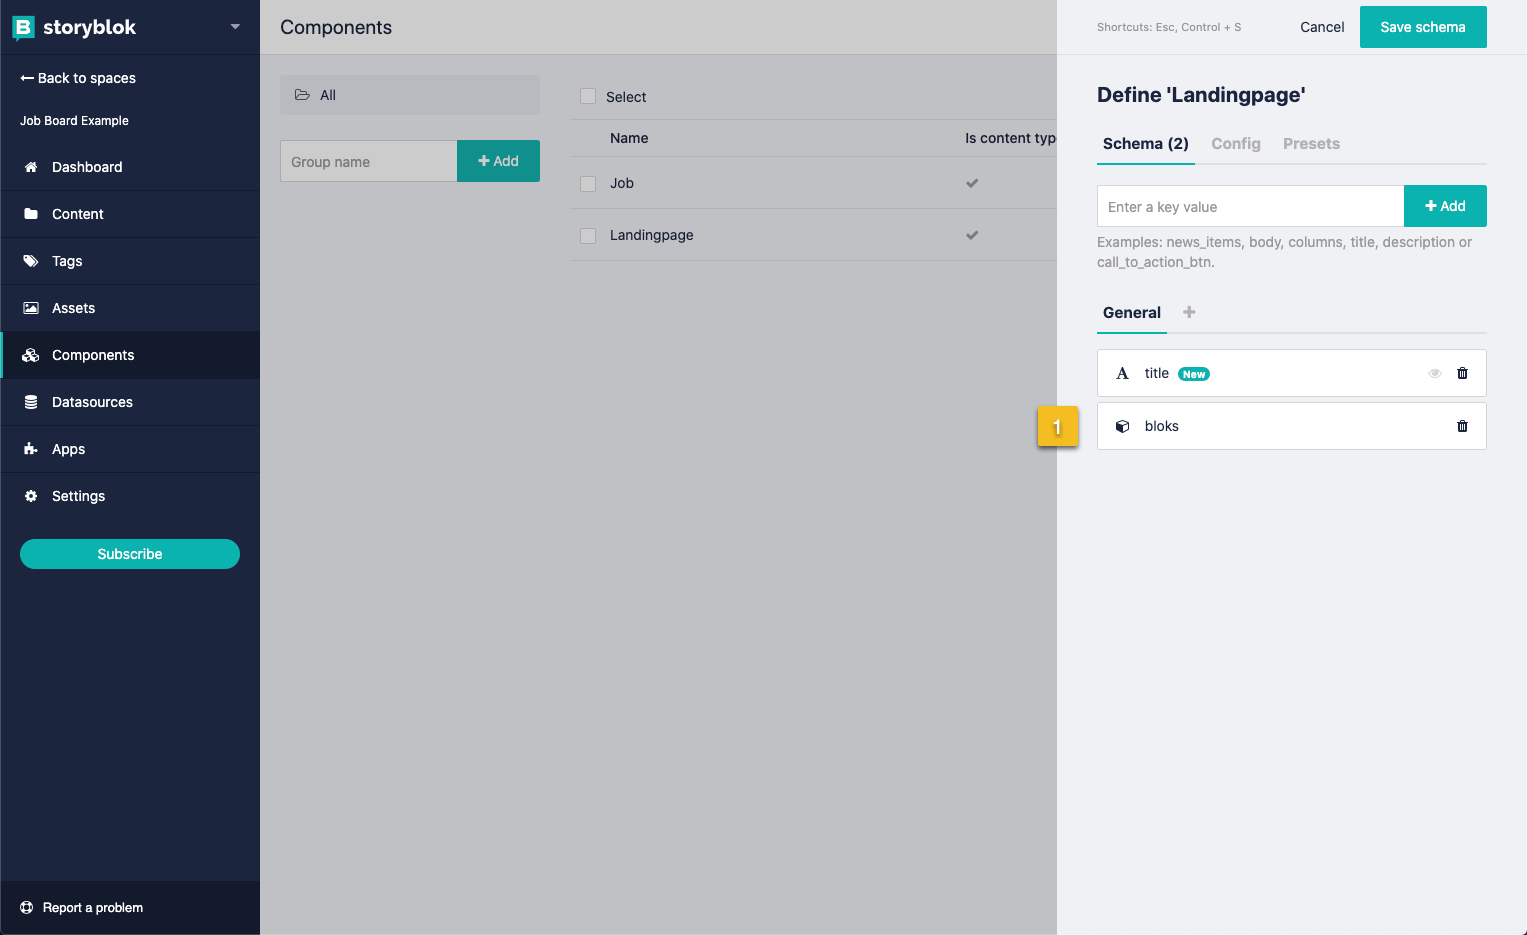
- Navigate to: Components -> New.
- {1} - Name for content type: Landingpage.
- {2} - Tick "Act as content type".
- Hit Next.
- {1} - Add a field title and the mentioned "Blocks" Field type. Important: Use
bloksas the field name to make it work with Nujek framework (will be explained later in the tutorial).
4. Pillar II - Create Storyblok Component Bloks
We have already learned about content types in the previous section. Now we will talk about "Bloks".
Let's take this hierarchy to see a clearer picture
 - Content Type
   - Field
    - Blok
    - Blok
    - Blok
    ...
Or even better:
 - Content Type: Landingpage
   - Field: title
   - Field: bloks (Blocks Field type)
    - Blok: BlokHero
    - Blok: BlokSlider
    - Blok: BlokText
    ...
So, that means our content type Landingpage allows us to insert as many bloks as we want into our bloks field. (Kind of confusing, I know.)
However, in practice we are going to do the following:
- Create a Page called "My Landingpage" with content type "Landingpage"
- Create different Bloks (Text, Images, Sliders, endless possibilities) inside the page we have created based on the given content type.
4.1 Hero Blok
Okay, enough with the talk! Let's continue with creating our flexible bloks. We will start with the Hero component, which is a nice header component to make our new website shiny 🌟.
Let's start with a simple hero component.
- Components -> New
- Name for content type: BlokHero (Important: Use the prefix "Blok" to make it work with Nujek Framework)
- Don't tick - "Act as content type" !
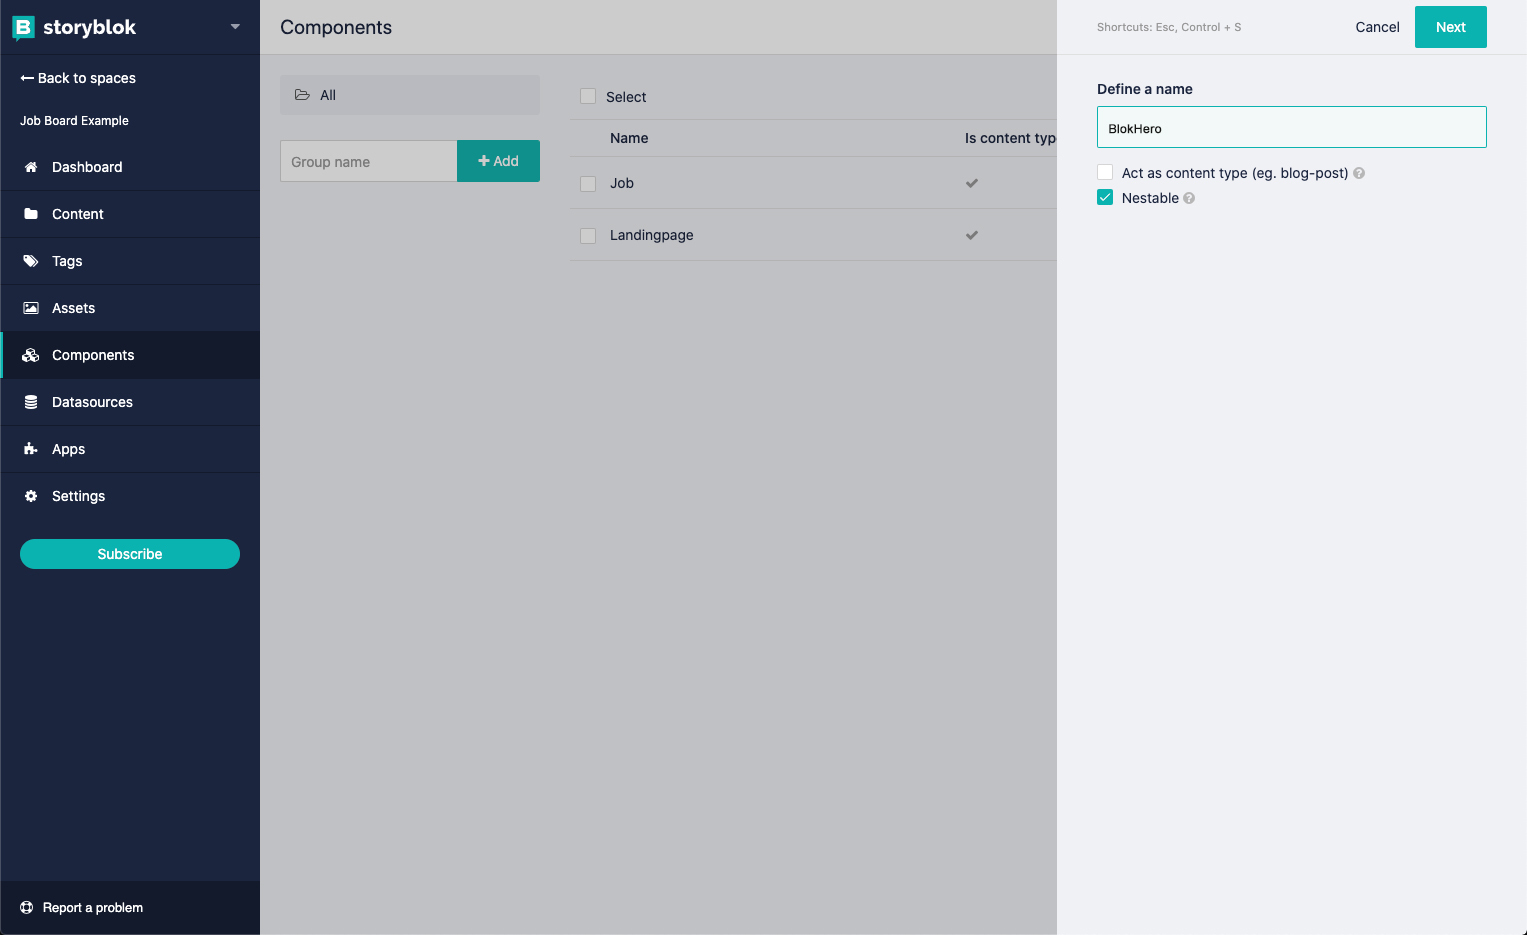
- Now we choose our fields. Add a title and an
assetsfield type with the optionsimage&video.
4.2 Jobs Blok
As we are going to build a job board, we need a simple job listing blok for the frontpage. So let's create a blok which will handle the blog listing later on.
Components -> New- Name for content type:
BlokJobsList - Don't tick -
Act as content type! - Just save the scheme and let's deal with possible fields later here.
I highly recommend making use of the component groups to organize the content-types/ and bloks/ as the amount of bloks will grow quickly within a bigger website. We can constrain the Landingpage bloks Bloks field as well, so that it will only be allowed to choose from a specific folder.
5. Pillar III - Create Storyblok Content
A long way to go, right? When delving into schema creation, it will only take us about 20-30 minutes to build an initial schema - which can always be adapted later on.
Now the third and last pillar of the Storyblok setup will be to create our content.
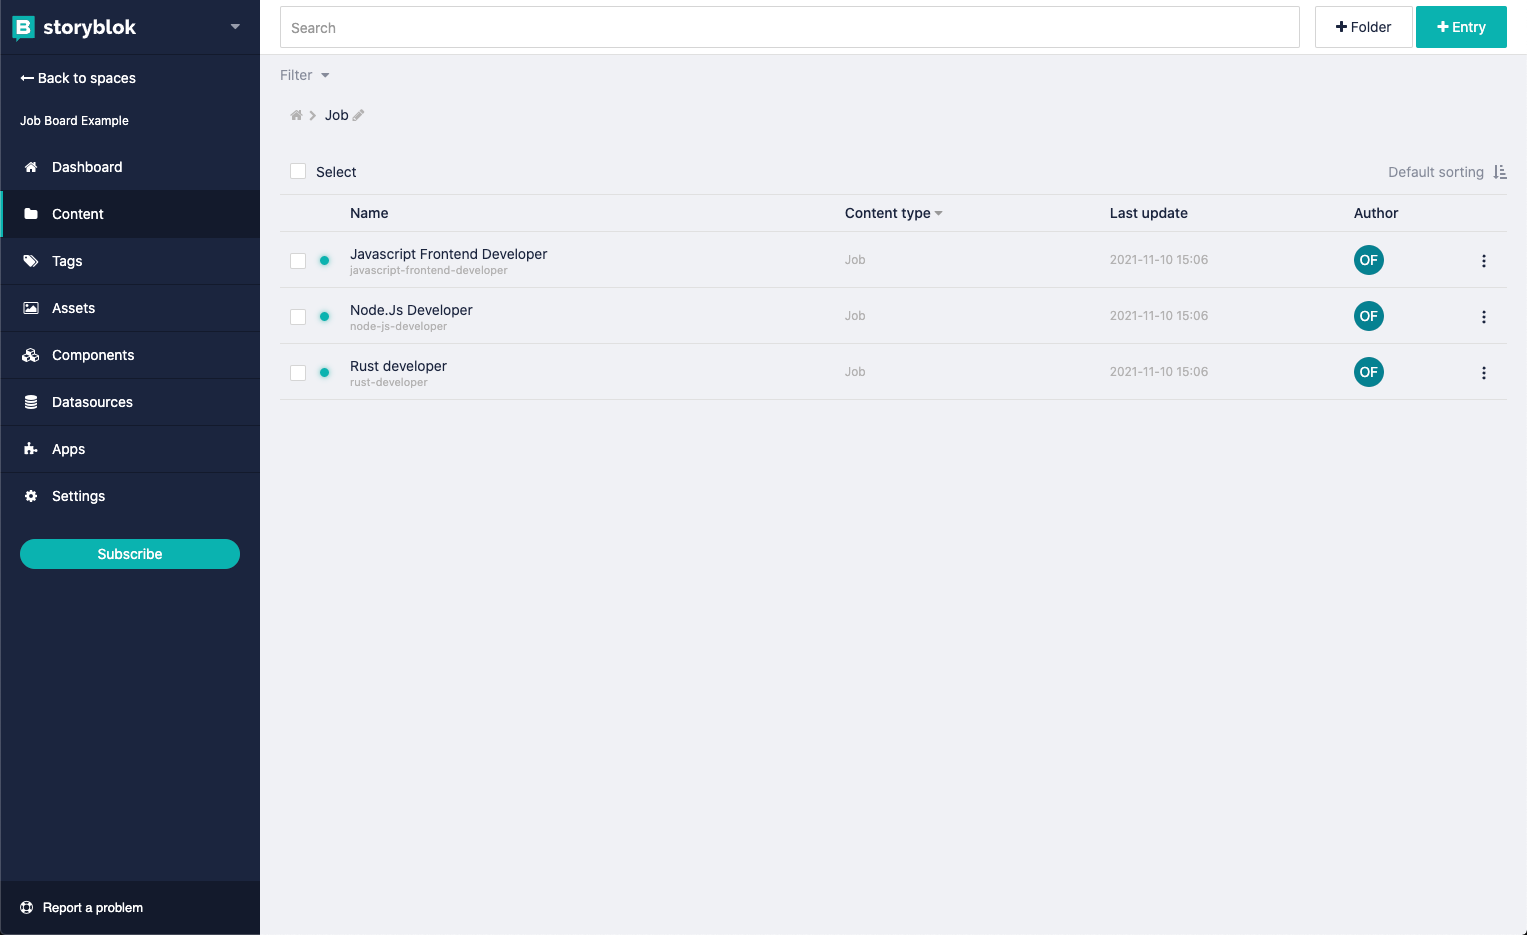
5.1 Create multiple job listings
Since we want to build a job board, we will need jobs to list on the board.
- Go to the Content folder on the left sidebar and add a folder named Jobs
- {1} - Name is Jobs
- {2} - Choose the default content Jobs which we created earlier
- Hit save

- Open the Jobs folder and quickly add 3 jobs with +Entry`** Button in the right-upper corner.
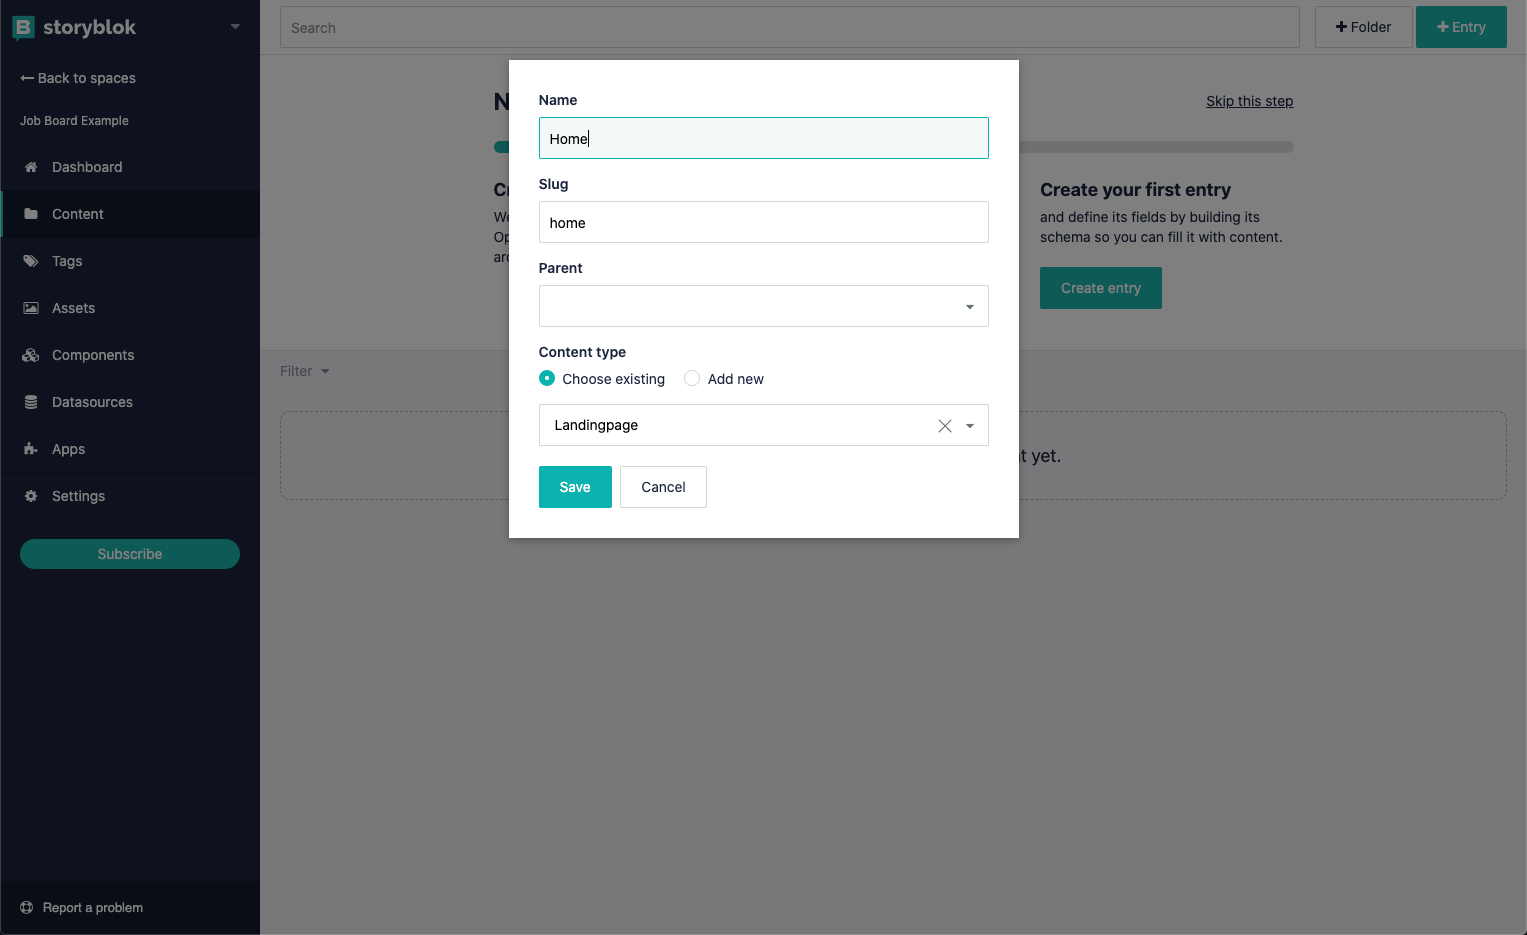
5.2 Create the homepage
Our homepage is the site that we will see first when we go to our url or in dev http://localhost:3000. We will make use of Landingpage now, with our flexible bloks Component to add multiple bloks to it.
- Go to the
Contentfolder on the left side and delete the defaultHomeStory page. - Click on +Entry (In the right upper corner)
- Add new story with Name and content Type
Landingpage
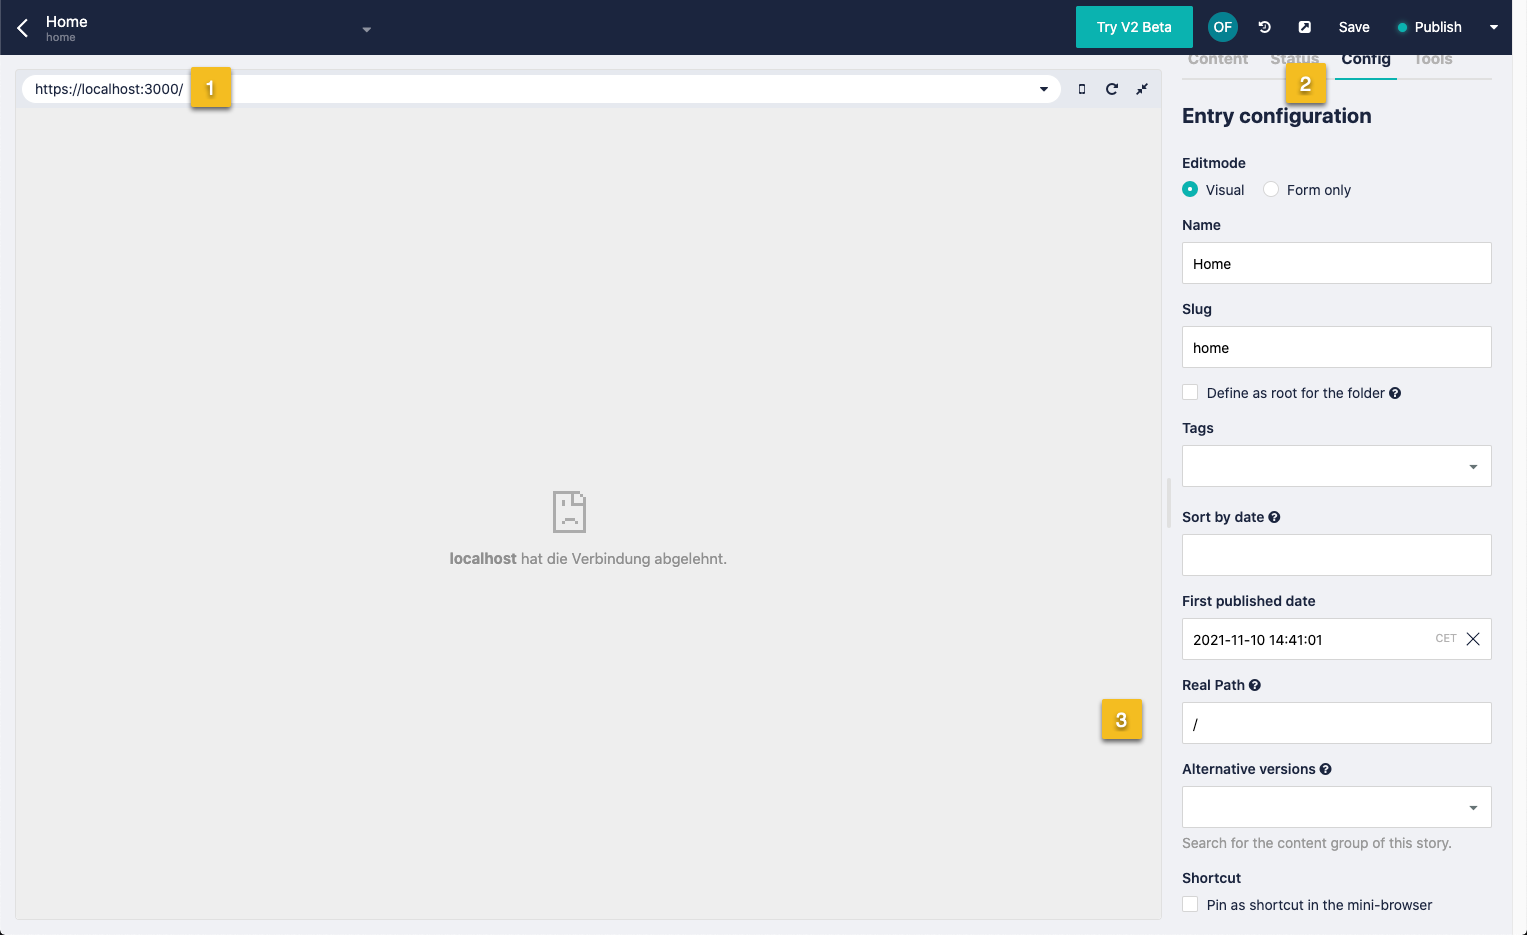
- {1} - Switch to preview urls and set it to
http://localhost:3000/ - {2} - In the right tab menu click
Configand then... - {3} - update
Real Pathto/ - Click on publish
Attention: We need to set the preview url to http:// and not https://. It's a simple mistake I made before, as you can see on the following screenshots.
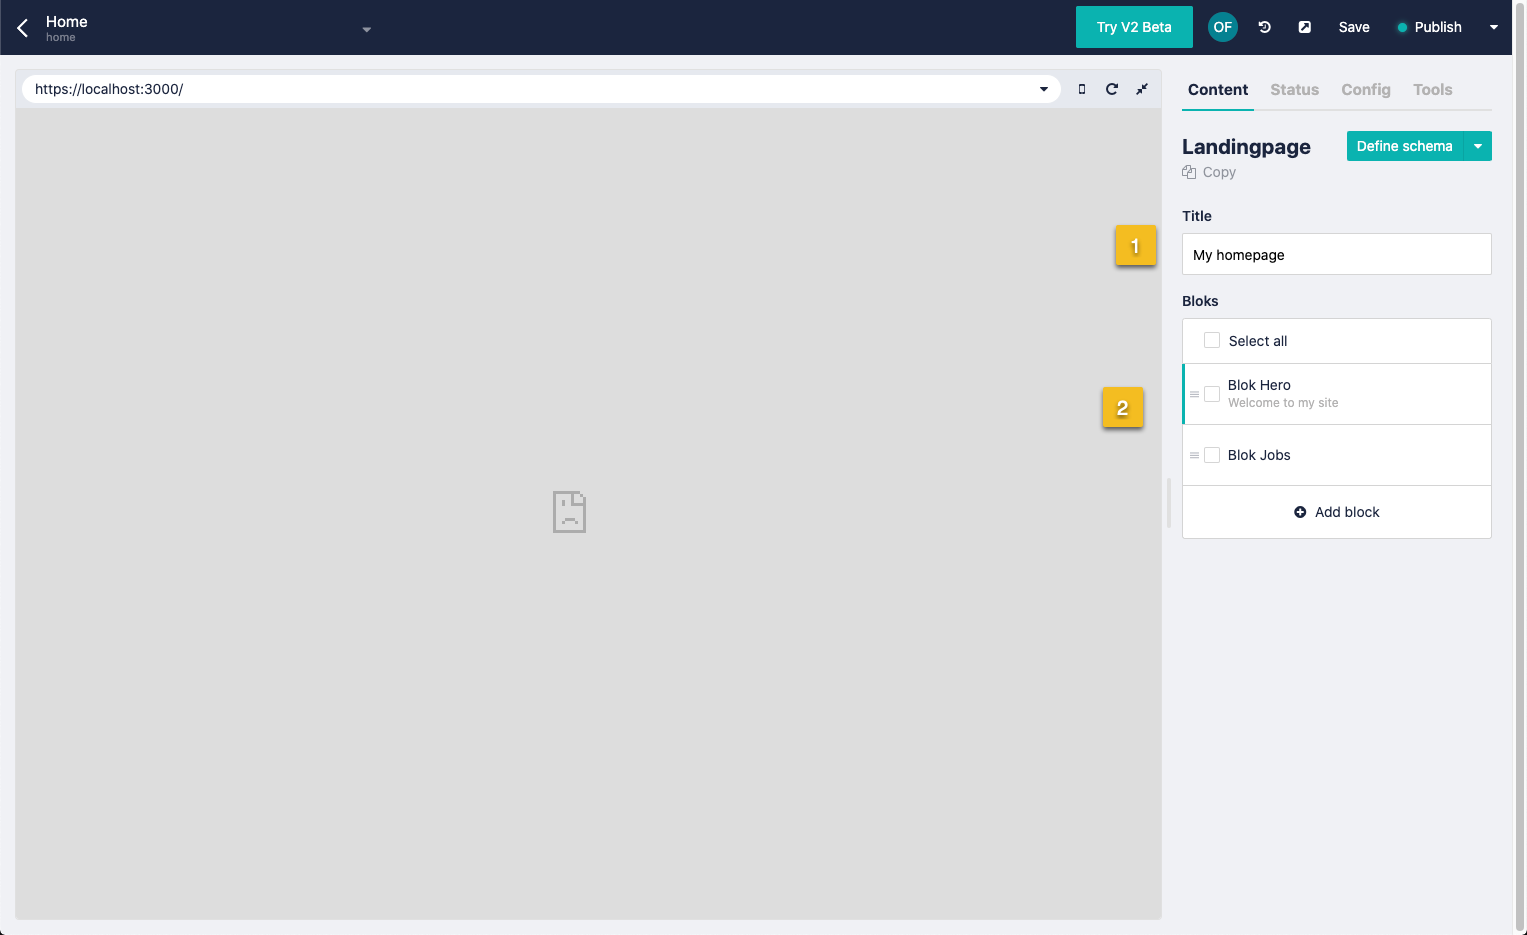
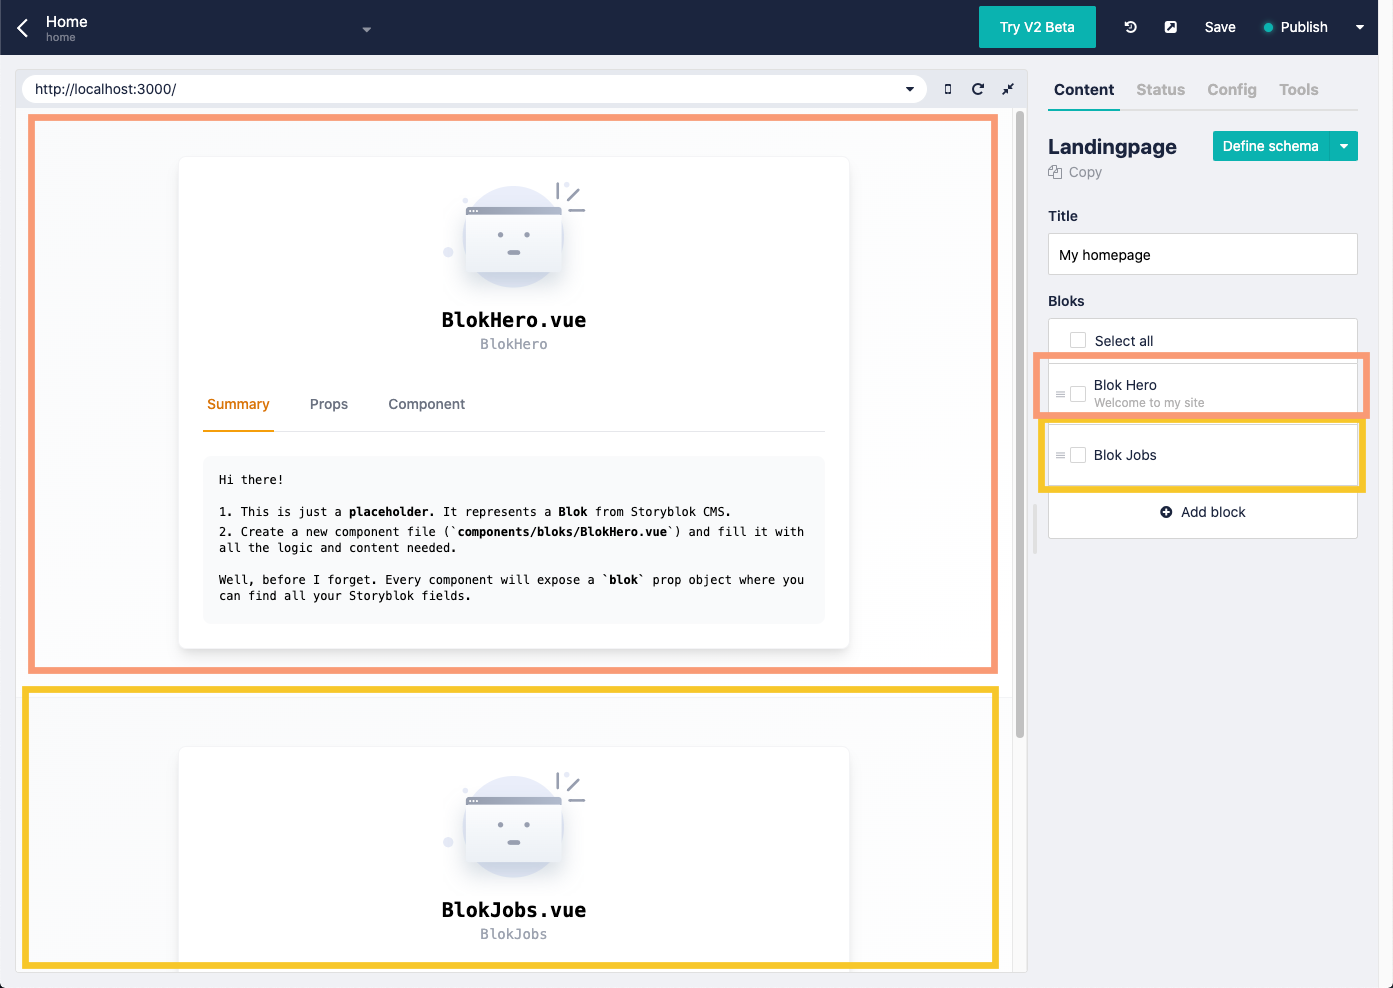
Fill the homepage with some bloks.
- Click + Add Blocks and add
BlokHeroandBlokJobs - {1} - Add a title to the current page (may be used later - just to demonstrate fields on content types)
- {2} - Add a 🖍️ fancy
titleandimageto the hero component - Click on publish
There's no preview for us to see how our content looks like. We just built our CMS Content Structure and that's it.
In the next part we will build the job board with Nuxt.Js and Nujek and connect it to Storyblok.
6. Building the Job Board frontend
6.1 Project Setup
From now on, it's probably better to start building our website to see what our scheme looks like on the frontend. We're simply going to build our frontend with
- Nuxt.js
- TailwindCSS
- Nujek
We won't go through all the steps in this post, since there's already a detailed tutorial on the nujek documentation, explaining how we can quickly build up our project.
We can choose between Manual Setup or Clone the repository according to our preference...
Start with Manual Setup...
Let's read the install docs from nujek and come back later when we're finished.
... or clone the repository
If you are as lazy as I am and you simply do not want to install everything from scratch, then just clone the repository from here and checkout the boilerplate branch.
git clone git@github.com:regenrek/nujek-job-board.git
git checkout boilerplate
Important: We have to create a .env file and add our Storyblok API Token to it.
- 📝
.env
SB_CLIENT_ACCESS_TOKEN=<your-token>Install & run
yarn;yarn dev6.2 Run the application
If we run the application with the following command we should see something like this
yarn dev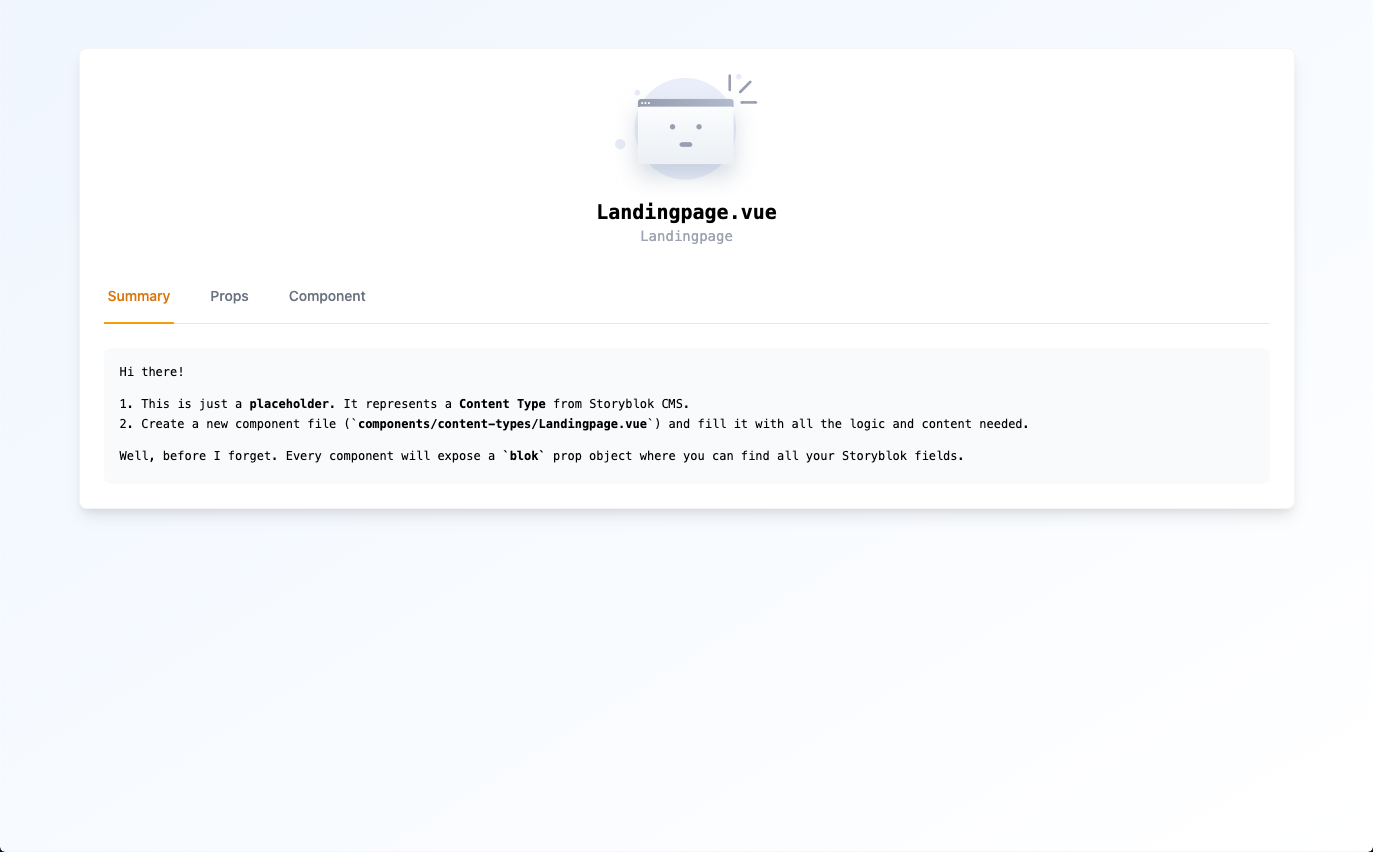
What we see on this screen is the previously created content type "Landingpage". Wait, you wonder how this is already working? I'll explain it real quick:
The nujek module in the nuxt.config.js is acting as a bridge to Storyblok. That's all! If you want to read more on nujek you can dig into nujek docs later.
- 📝
nuxt.config.js
  buildModules: [
    '@nujek/bundle',
    // other entries
  ],
  nujekStoryblok: {
    storyblokConfig: {
      accessToken: process.env.SB_CLIENT_ACCESS_TOKEN
    }
  },
6.3 Build the "Landingpage" component
First we start with building the content types of our frontend (like we did before in Storyblok).
Good to know: Nujek gives us already prewritten code snippets. We can simply click on the Component Tab and copy-paste the code we need for the Landingpage.
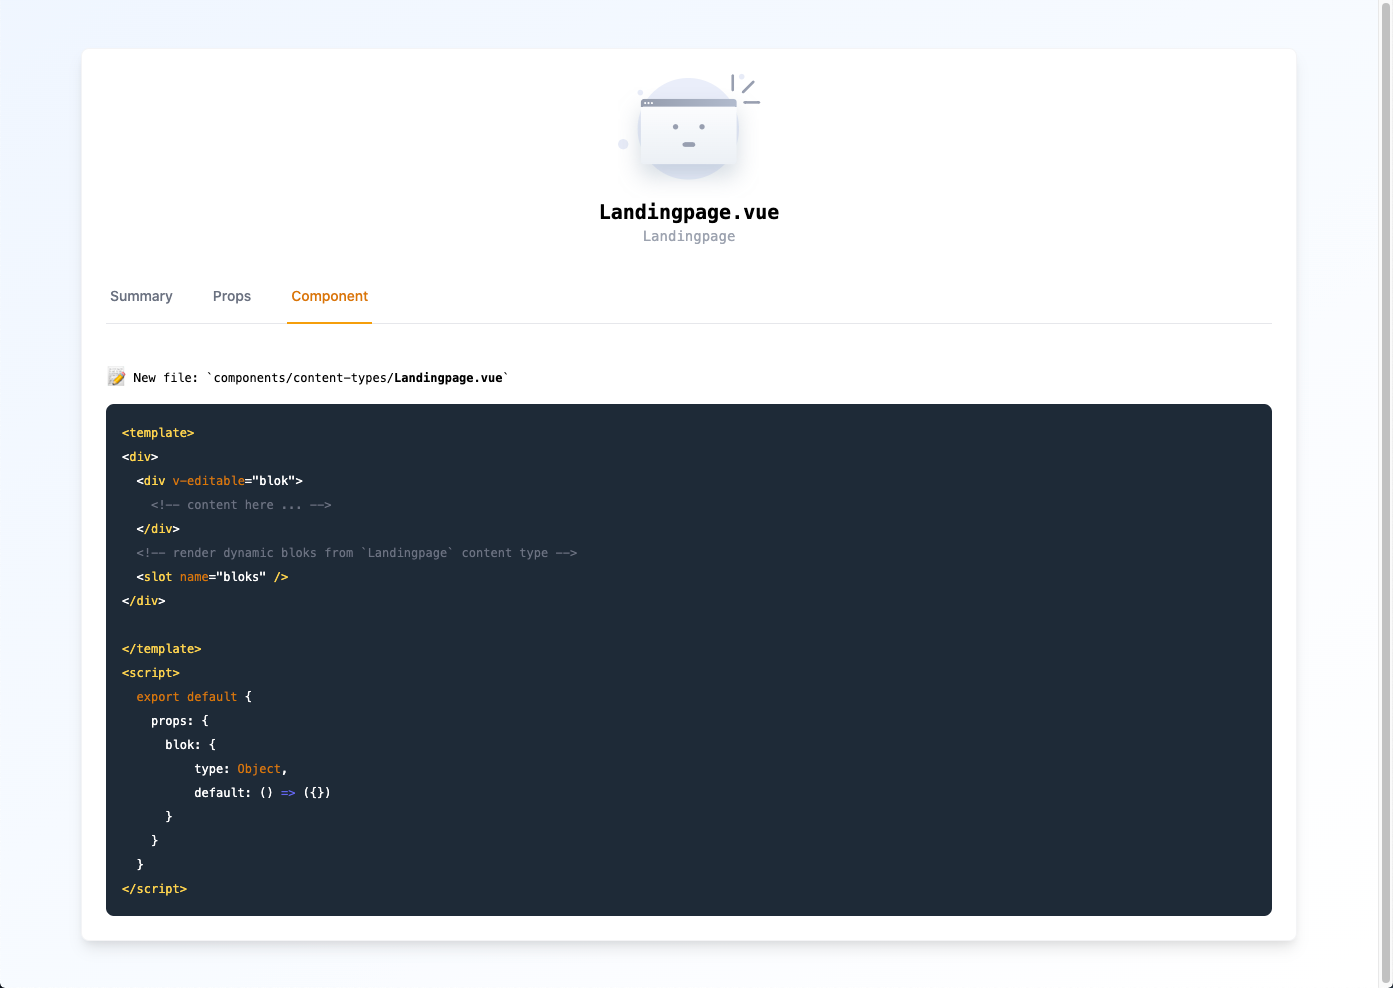
- The Slot
<slot name="bloks" />is used to place it on the correct position within the Landingpage. - In our example we just use the slot to show underlying bloks.
- 📝
content-types/Landingpage.vue
<template>
  <div>
    <!-- render dynamic bloks from `Landingpage` content type -->
    <slot name="bloks" />
  </div>
</template>
<script>
export default {
  props: {
    blok: {
      type: Object,
      default: () => ({})
    }
  }
}
</script>
Save the file and reload the page (Sometimes the dev server needs to be reloaded as well).
When we open the Home Page in Storyblok, we can see the relation between the CMS and our frontend. All of this should make a lot more sense now. 🙌
6.4 Build "BlokHero" component
Next we're going to the BlokHero component to display our fancy hero title.
- Create
bloks/BlokHero.vuefile - We will always get a
bloksprop object where our filled fields are stored. - Use
blokprop to fill components like for<SbImage :src="blok.image" />(SbImage)
The blok prop contains all our fields from Storyblok. It populates data to each of our Blok components. Earlier we have defined a title and an image for the BlokHero component. Now we can access them easily with
<div>
  <h1>{{ blok.title }}</h1>
  <img :src="blok.image.filename" />
</div>- 📝
bloks/BlokHero.vue
<template>
  <div v-editable="blok">
    <div class="relative">
      <div class="absolute inset-x-0 bottom-0 h-1/2 bg-gray-100" />
      <div class="max-w-7xl mx-auto sm:px-6 lg:px-8">
        <div class="relative shadow-xl sm:overflow-hidden">
          <div class="absolute inset-0">
            <SbImage
              v-if="blok.image"
              :src="blok.image"
              :classes="{picture: 'aspect-ratio-16/9', image:'object-cover h-full w-full' }"
              :resize="{ width: '1200', height: '0' }"
            />
            <div class="absolute inset-0 bg-yellow-200 mix-blend-multiply" />
          </div>
          <div class="relative px-4 py-16 sm:px-6 sm:py-24 lg:py-32 lg:px-8">
            <h1 class="text-center text-4xl font-extrabold tracking-tight sm:text-5xl lg:text-6xl">
              <span class="block text-white">We're Hiring</span>
              <span class="block text-yellow-200">Join us today!</span>
            </h1>
            <p class="mt-6 max-w-lg mx-auto text-center text-xl text-yellow-200 sm:max-w-3xl">
              We're looking for people to play! :)
            </p>
          </div>
        </div>
      </div>
    </div>
  </div>
</template>
<script>
export default {
  props: {
    blok: {
      type: Object,
      default: () => ({})
    }
  }
}
</script>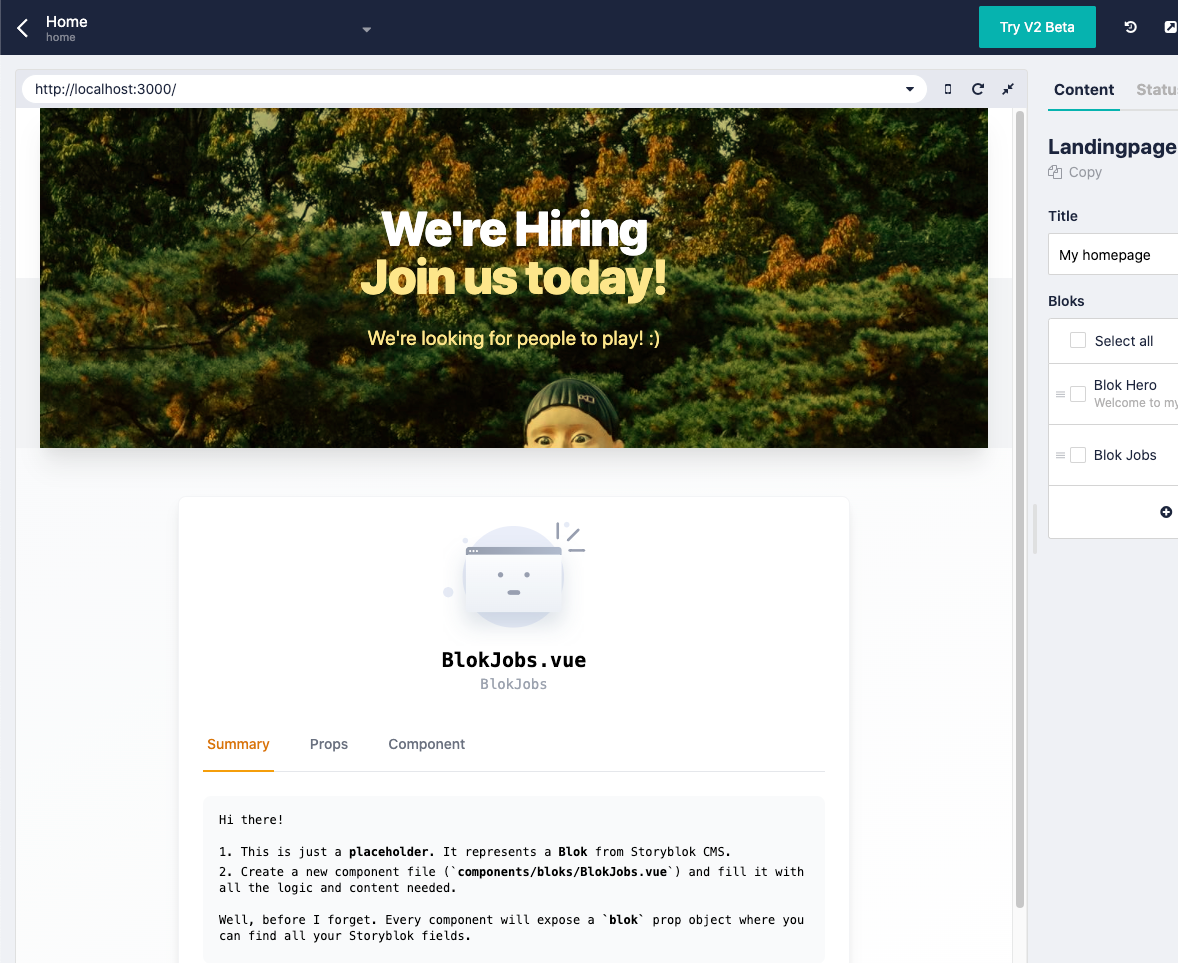
6.5 Build "BlokJobListing" component
Below the hero, we want to show the latest jobs available.
- We make use of
<NjSection />to build consistent container constraints - To retrieve multiple stories from Storyblok (e.g. from
jobs/folder) Nujek offers the<SbQuery />which we are going to use in the next example. <SbQuery />: Limit posts per pageposts-per-page-client-onlyto 1 and usepathto filter stories by slug. Path is important to retrieve our story collection.- We use
#defaulttemplate to create a custom single template for our job items.
- 📝
bloks/BlokJobListing.vue
<template>
  <NjSection
    variant="constrained"
    :fixed-classes="{ wrapper: 'pt-12 pb-24', container: 'max-w-3xl' }"
  >
    <div class="shadow overflow-hidden sm:rounded-md">
      <ul role="list" class="divide-y divide-gray-200">
        <SbQuery :posts-per-page-client-only="1" path="jobs" :filter-client-only="true">
          <template #default="story">
            <JobItem :title="story.content.title" :salary="story.content.salary" :link="story.full_slug" />
          </template>
        </SbQuery>
      </ul>
    </div>
    </div>
  </NjSection>
</template>

<script>
export default {
  props: {
    bloks: {
      type: Object,
      default: () => ({})
    }
  }
}
</script>
Now let's create a reusable component to display a single job item.
- 📝
bloks/atoms/JobItem.vue
<template>
  <li>
    <nuxt-link :to="link" class="block hover:bg-gray-50">
      <div class="px-4 py-4 sm:px-6">
        <div class="flex items-center justify-between">
          <p class="text-lg font-medium text-blue-500 truncate">
            {{ title }}
          </p>
          <div class="ml-2 flex-shrink-0 flex">
            <p class="px-2 inline-flex text-xs leading-5 font-semibold rounded-full bg-green-100 text-green-800">
              {{ salary }}
            </p>
          </div>
        </div>
      </div>
    </nuxt-link>
  </li>
</template>

<script>
export default {
  props:
    {
      title: {
        type: String,
        default: ''
      },
      salary: {
        type: String,
        default: ''
      },
      link: {
        type: String,
        default: ''
      }
    }
}
</script>
We should now see a single job listing. We set posts-per-page-client-only to a value of 1. We can also try the infinite loader, which is included in <SbQuery> and click on Load more.
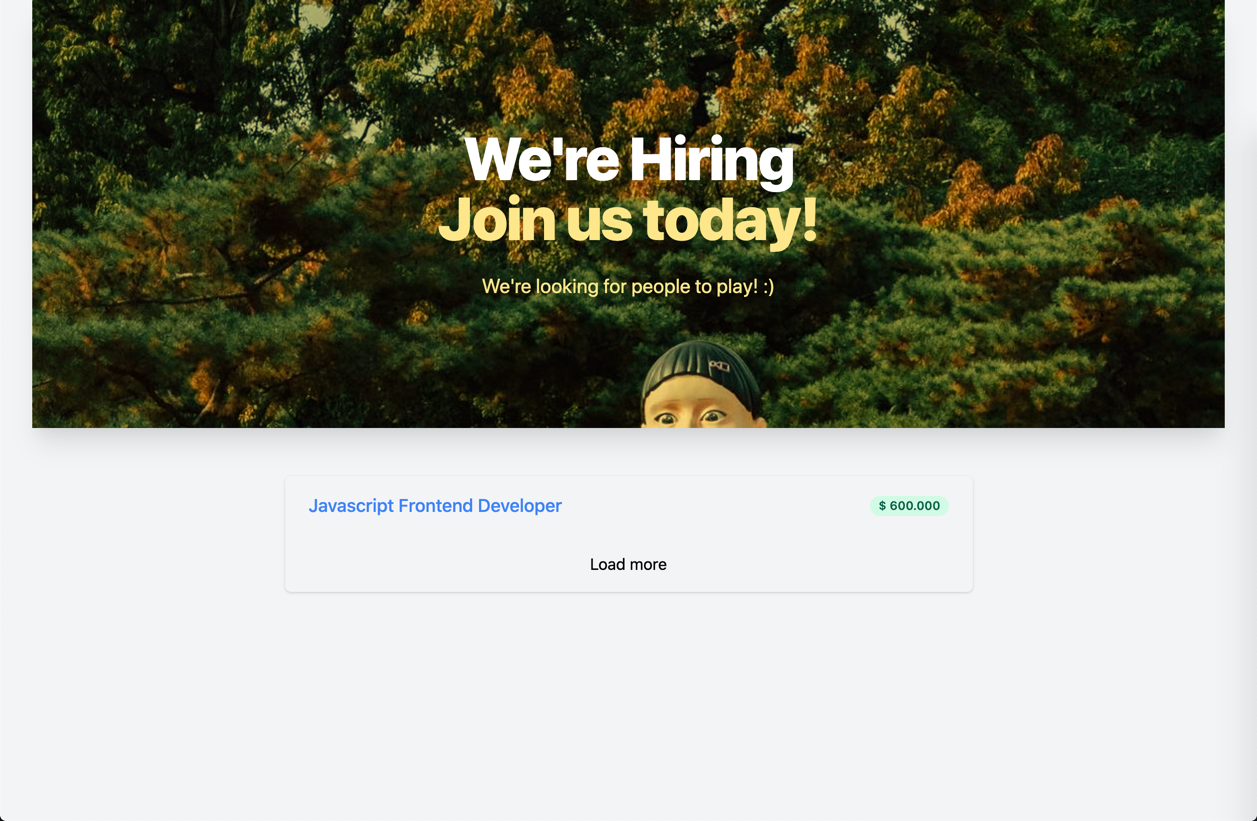
To show more jobs from the start, let's increase the posts-per-page-client-only prop to 5.
6.6 Add Richtext support
As you might remember, we used the richtext (Job description) field type for the Job content type. This field is more complex to render on the frontend. Luckily a package exists which helps us here.
To proceed we need to extend our application with a plugin and add the VueRichTextRenderer
- 📝
plugins/richtext.js
import Vue from 'vue'
import VueRichTextRenderer from '@marvr/storyblok-rich-text-vue-renderer'
Vue.use(VueRichTextRenderer)- Add the plugin to the config section
- Important: Add the package to
transpilesection!
- 📝
nuxt.config.js
  plugins: [
    { src: '~/plugins/richtext.js' }
  ],
  build: {
    transpile: [
      '@marvr/storyblok-rich-text-vue-renderer'
    ]
  }
6.7 Create the Job Detail page
We did it, we can now show a list of jobs on our homepage from Storyblok. Nujek has already saved us a ton of time while building our frontend.
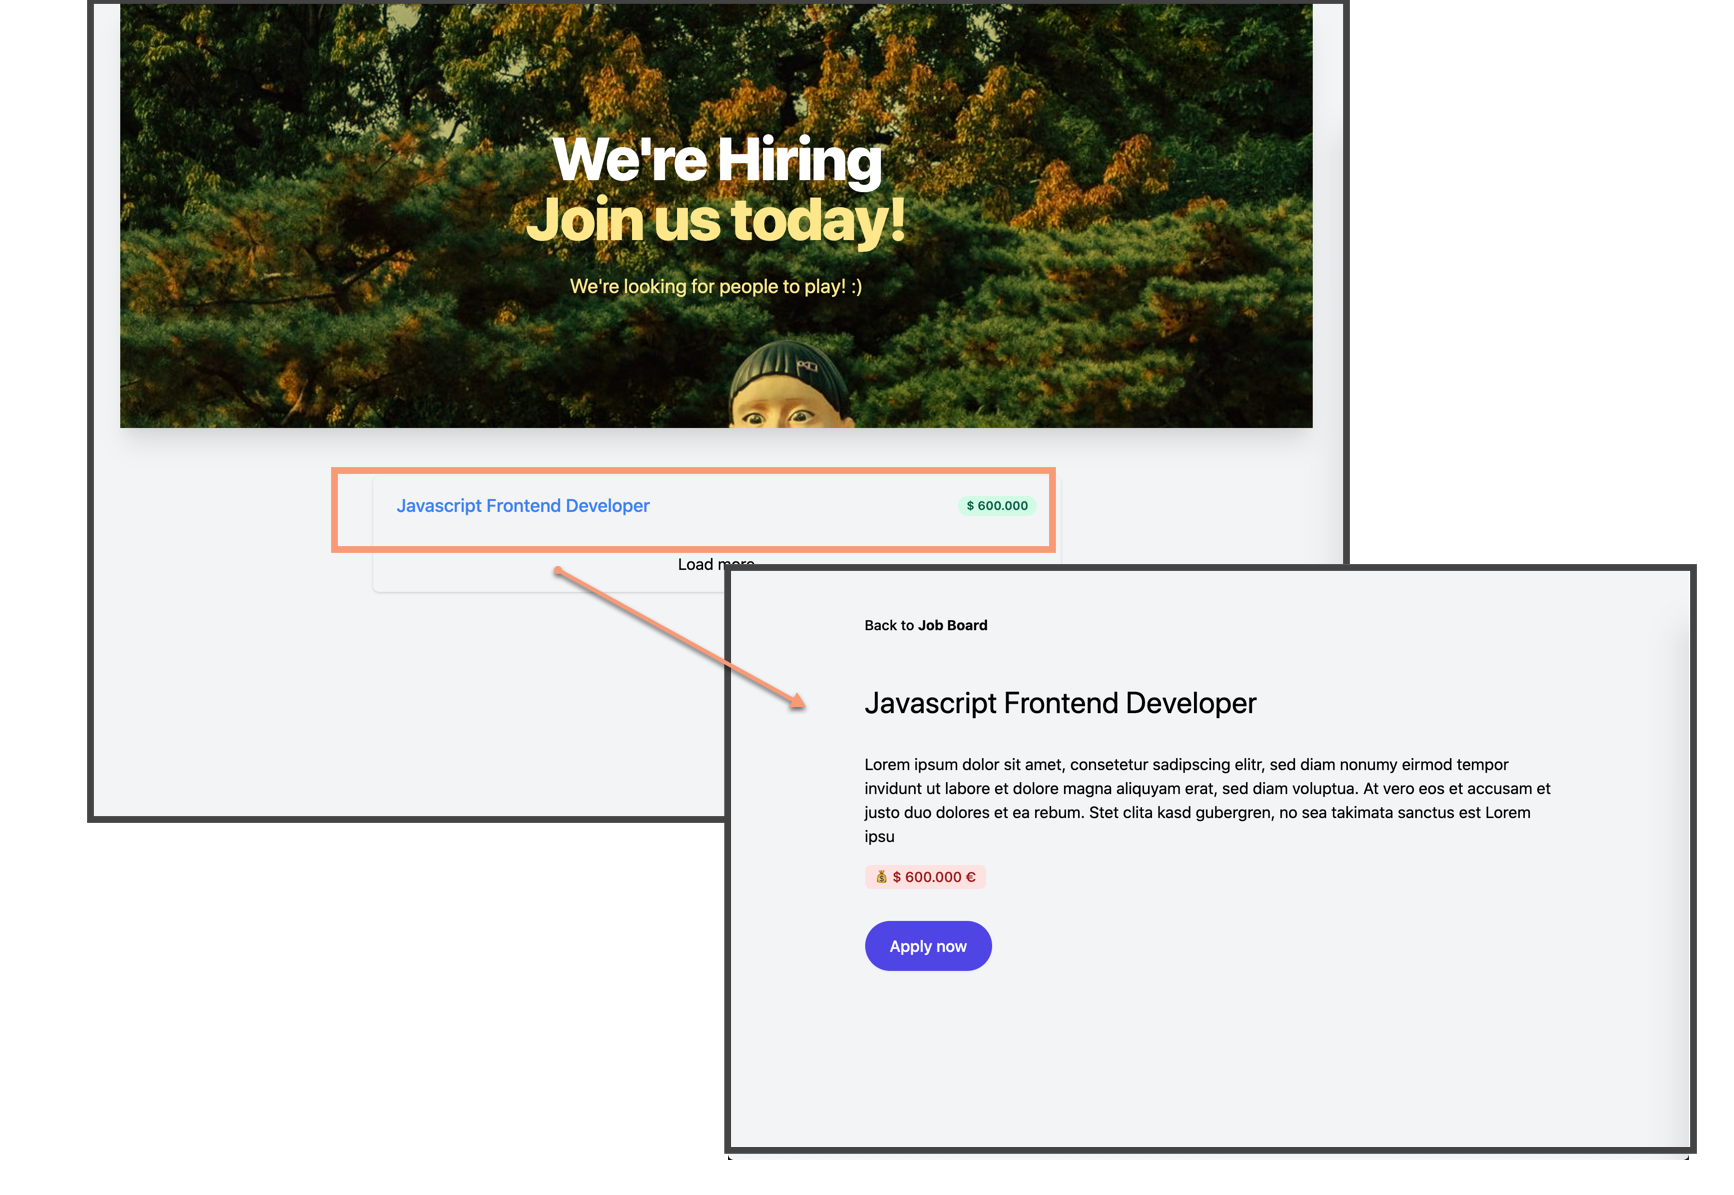
- First rename
pages/index.vuetopage/_.vueto create a catch all route. The catch all route matches any url we type in.
pages/
  _.vue
Then add the content type template for the Job content type.
- 📝
components/content-types/Job.vue
<template>
  <NjSection
    variant="constrained"
    :fixed-classes="{ wrapper: 'pt-12 pb-24', container: 'max-w-3xl' }"
  >
    <nav aria-label="Back">
      <nuxt-link to="/" class="py-2 text-sm font-medium">
        Back to <b>Job Board</b>
      </nuxt-link>
    </nav>

    <div v-if="blok" class="py-12">
      <h1 class="text-3xl">
        {{ blok.content.title }}
      </h1>
      <SbRichtext class="mt-8" :text="blok.content.description" />

      <span class="block mt-4">
        <span class="inline-flex items-center px-2.5 py-0.5 rounded-md text-sm font-medium bg-red-100 text-red-800">
          💰 {{ blok.content.salary }} €
        </span>
      </span>

      <button type="button" class="mt-8 inline-flex items-center px-6 py-3 border border-transparent text-base font-medium rounded-full shadow-sm text-white bg-indigo-600 hover:bg-indigo-700 focus:outline-none focus:ring-2 focus:ring-offset-2 focus:ring-indigo-500">
        Apply now
      </button>
    </div>
  </NjSection>
</template>

<script>
export default {
  props: {
    blok: {
      type: Object,
      default: () => ({})
    }
  }
}
</script>
If the job description doesn't display at all, double-check if the vue-rich-text-renderer (6.6 Add richtext support) has been added.
7. Deploy on vercel
Personally I can recommend vercel, netlify and AWS Amplify for hosting your sites.
Always check which rendering mode you are targeting.
For this app we're targeting ssr mode and choose vercel as the hosting provider.
Before pushing our project to vercel we're adding a vercel.json file to the project root. Read more here: nuxt/vercel-builder.
{
  "version": 2,
  "builds": [
    {
      "src": "nuxt.config.js",
      "use": "@nuxtjs/vercel-builder"
    }
  ]
}
7. Conclusion
If you made it this far - big respect! It's been a long tutorial, but we just scratched the surface of what is possible with these great tools.
For example, we could extend this project with
- Controling which jobs we like to show in Storyblok (with relations).
- Filtering, sorting and searching job listings.
- Showing job listings in a modal with SEO routing.
- Building a navigation bar and a footer.
And so much more...
I love getting feedback! If you have any questions you can ask me in the comment section below or on twitter @kregenrek
Happy Coding! 🙌🎉