How to build a breakfast restaurant locator with nuxtjs and algolia search
Table of Contents
Table of Contents
- Table of Contents
- Demo
- 1. Introduction
- 2. Project Setup
- 3. Building a simple map with vue leaflet
- 4. Setup algolia
- 4.2 Import test data
- 4.3 Get an algolia search api key
- 5. Use
nuxtwith algolia instantsearch - Whats next?
- Source on github
Demo
- Here is a CodeSandbox Demo written with
vue - Github Source Code
ATTENTION: This example doesn't work until you generate your own App ID and Api Key with algolia search.
1. Introduction
It seems that dining in breakfast restaurants are the new cool thing in austria. There restaurants which business model is to offer exclusively breakfast all day long. So this is the right time to build a breakfast restaurant locator with nuxtjs and algolia search. To get started I try to exaplain some basic stuff about nuxtjs, leaflet library and algolia search.
1.1 nuxtjs + vue
Basically nuxtjs is a static site generator like many others out there. Either you never heard about static site generators (and JAMStack) or you probably have been playing around with gatsby, jekyll, hugo or next.js (I'm going to stop here). If you can agree on the second argument you can just add nuxtjs to the list which is based on vue where others based on react like gatsby and nextjs or go like hugo. If you new to static site generators I have to slightly disappoint you. I don't have a tutorial yet. But if you into modern web development with possible wordpress background. Read some stuff about JAMStack and you will never go back (i guess not).
Ok now to nuxtjs. The reason why I prefer nuxtjs above other frameworks is because it's build on vue. And vue is awesome. After angularjs went from v1.0 to v2.0 I was looking for alternatives and found react. The modular component approach is great but honestly I never felt comfortable with jsx. So I gave vue a try which was a good decision since it has been my favourite frontend framework right now.
I'm just bit a afraid of vue 3 which looks more than react.
1.2 leaflet
If you ever wanted to build interactive maps you can build them on some super cool services like mapbox, https://openlayers.org/, google maps and many more. And there is leaflet which seems on the first sight a bit outdated in terms of their website but its open source and maintained. And on top of that there is an vuejs library called vue2-leaflet which we're going to use in this project.
1.3 algolia
When I started to build search for applications I thought it will be really complex and exhausting. When I discovered algolia it seemed too easy for me (Ok I'm totally lying I already had my troubles with it). You start to configure your api, create your index and define what columns should be searchable. Thats it. And its really, really fast. Some of the biggest companies around are using algolia successfully.
2. Project Setup
First we're going to create a new nuxtjs project. I will use TailwindCSS UI Framework to style the application but feel free to use whatever you feel comfortable.
➜  learning-nuxt npx create-nuxt-app nuxt-leaflet-algolia
npx: Installierte 377 in 12.772s
create-nuxt-app v2.8.0
✨  Generating Nuxt.js project in /Users/regenrek/projects/learning-nuxt/nuxt-leaflet-algolia
? Project name nuxt-leaflet-algolia
? Project description My cat's meow Nuxt.js project
? Author name regenrek
? Choose the package manager Yarn
? Choose UI framework Tailwind CSS
? Choose custom server framework None (Recommended)
? Choose Nuxt.js modules Axios
? Choose linting tools ESLint
? Choose test framework None
? Choose rendering mode Single Page App
cd nuxt-leaflet-algoliaWe're using vue2-leaflet to build our map which is a pretty nice wrapper for the leaflet library. Of course we need leaflet library itself and since we're building this app with nuxt I recommend to use nuxt-leaflet.
yarn add vue2-leaflet leaflet nuxt-leaflet2.1 Use nuxtjs with leaflet
If you try to use nuxtjs with leaflet we will run into some minor issues which can be avoided with the 2 options below:
Option a) Use nuxt-leaft
Either you use the nuxt-leaflet module which will help us with the following tasks:
- It allows us to use
vue-leafletcomponents app-wide. - It will replace the marker-icon path to a
cdnwhich allows us to use leaflet map markers. - It will include the
leaflet.cssfile from theleafletpackage.
- Add to
modulessection innuxt.config.js
modules: [
    "nuxt-leaflet"
]
Option b) Setup manually
If you want to know whats going on behind the scene and be more flexible you definitely should do it by your own and skip nuxt-leaflet (don't worry it's not difficult).
You can setup leaflet manually according to this well written summary.
For this tutorial I'm using nuxt-leaflet
3. Building a simple map with vue leaflet
- First we're going to import the necessary components from
vue2-leafletpackage. Then we using them in the<template>section to build the desired markup. <l-map>is used to build our map with some additional attributes like what default:zoomdo we want to have or where should we:centerthe map view and so on.- One thing about the
height: Don't use%forwidthorheightinside<l-map>(as described in the docs) otherwise you will run in to this Vue2Leaflet/issue#157. <l-tile-layer>gives the map a structure/style. We're using the tileset from openstreetmap. You can read more in the leafletjs docs if you're interested. Lastly you could also use pretty mapbox tile layers
If you have included nuxt-leaflet to your module section you don't need to import vue2-leaflet and you don't need to define them in components section. But I always import libraries explicit. So I'm always aware what components I'm using on a page.
- Open
pages/index.vue
<template>
  <div>
    <l-map
      style="min-height: 100vh"
      :zoom="zoom"
      :center="center"
      :options="{zoomControl: false}"
    >
      <l-tile-layer :url="url"></l-tile-layer>
    </l-map>
  </div>
</template>
<script>
  import { LMap, LTileLayer } from "vue2-leaflet";

  export default {
    components: {
      LMap,
      LTileLayer
    },
    data() {
      return {
        url: "http://{s}.tile.osm.org/{z}/{x}/{y}.png",
        zoom: 10,
        center: [47.31322, -1.319482]
      };
    }
  };
</script>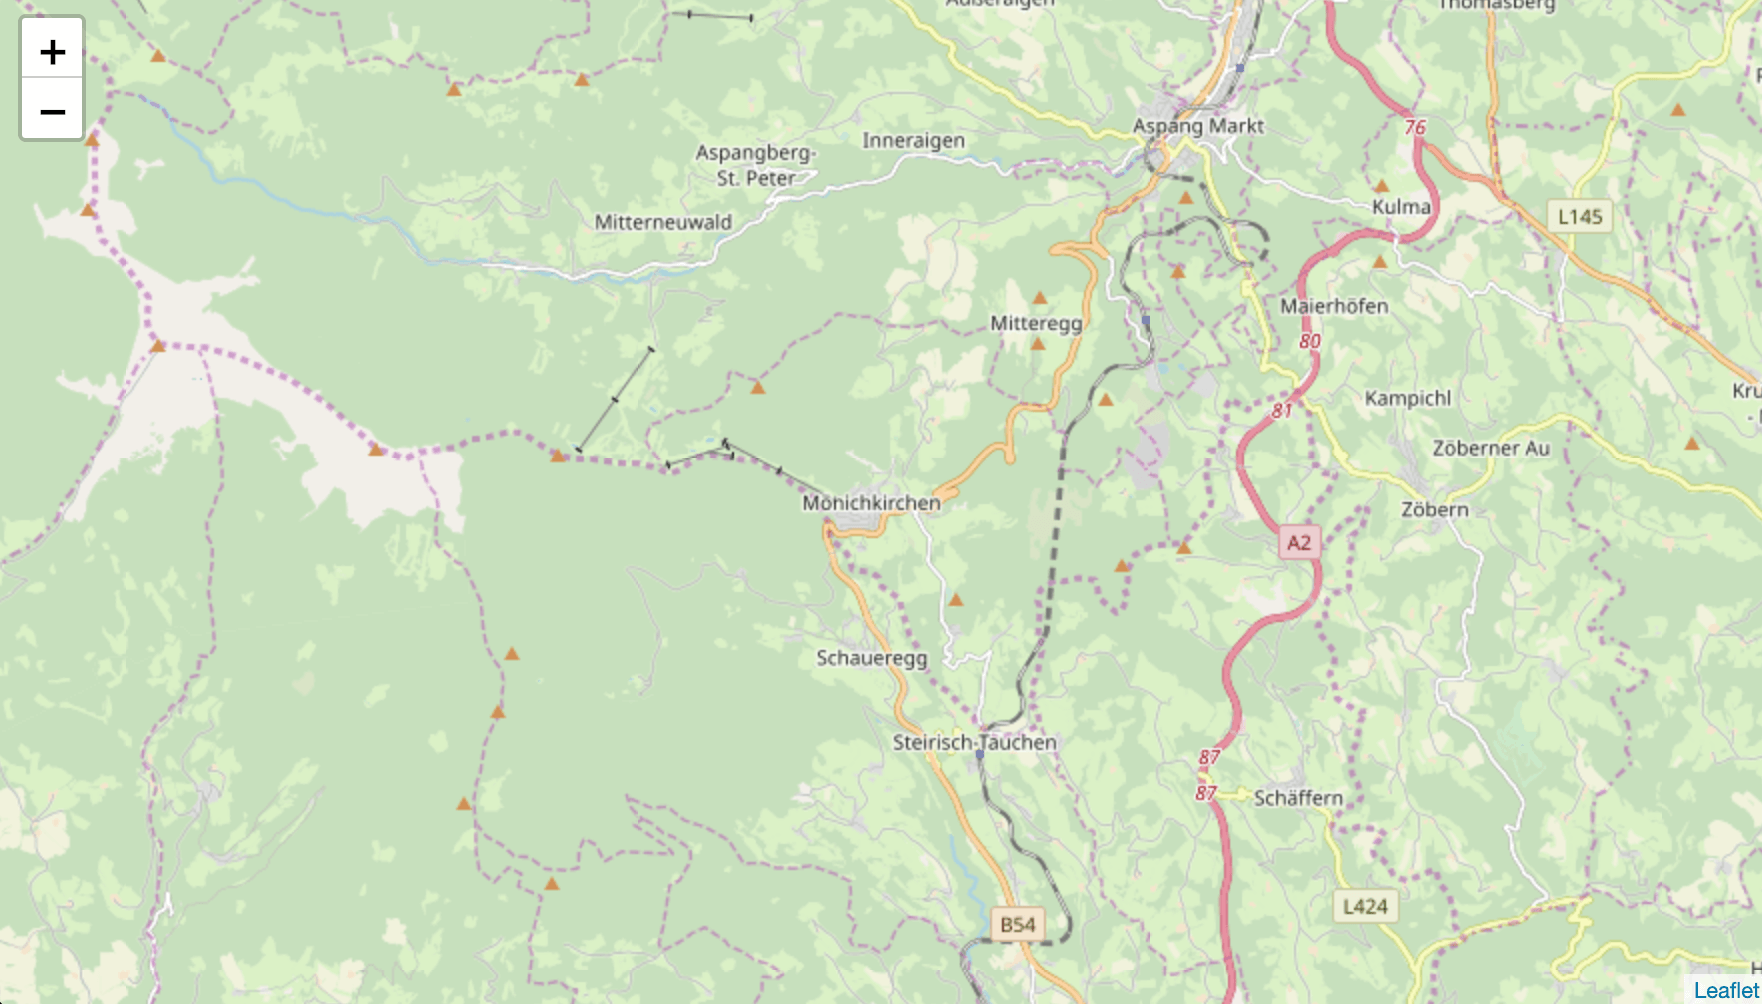
If everyhing worked so far you should see a fresh new map in your browser window.
3.1 Add markers to your leaflet map
Lets quick add some test map markers inside the map which we will replace with "real" breakfast restaurant geodata locations later.
    <l-map
      ...
    >
      <l-tile-layer :url="url"></l-tile-layer>
+     <l-marker
+       v-for="geoloc in [
+         { lat: 42.57101, lng: -0.54945 },
+         { lat: 47.5125, lng: 16.03823 },
+         { lat: 47.532612, lng: 16.154989 }
+       ]"
+       :key="geoloc"
+       :lat-lng="geoloc"
+     />
    </l-map>
Voila we've added some test markers with a simple v-for loop.
4. Setup algolia
Algolia is a cloud service provider who offers search services. If you interested about algolia search you can read my short summary in the introduction or visit the official website and docs. They have tons of information about it.
You need to sign up for a test account. Don't worry you can develop and test for free with in the community edition.
4.1 Create you first index
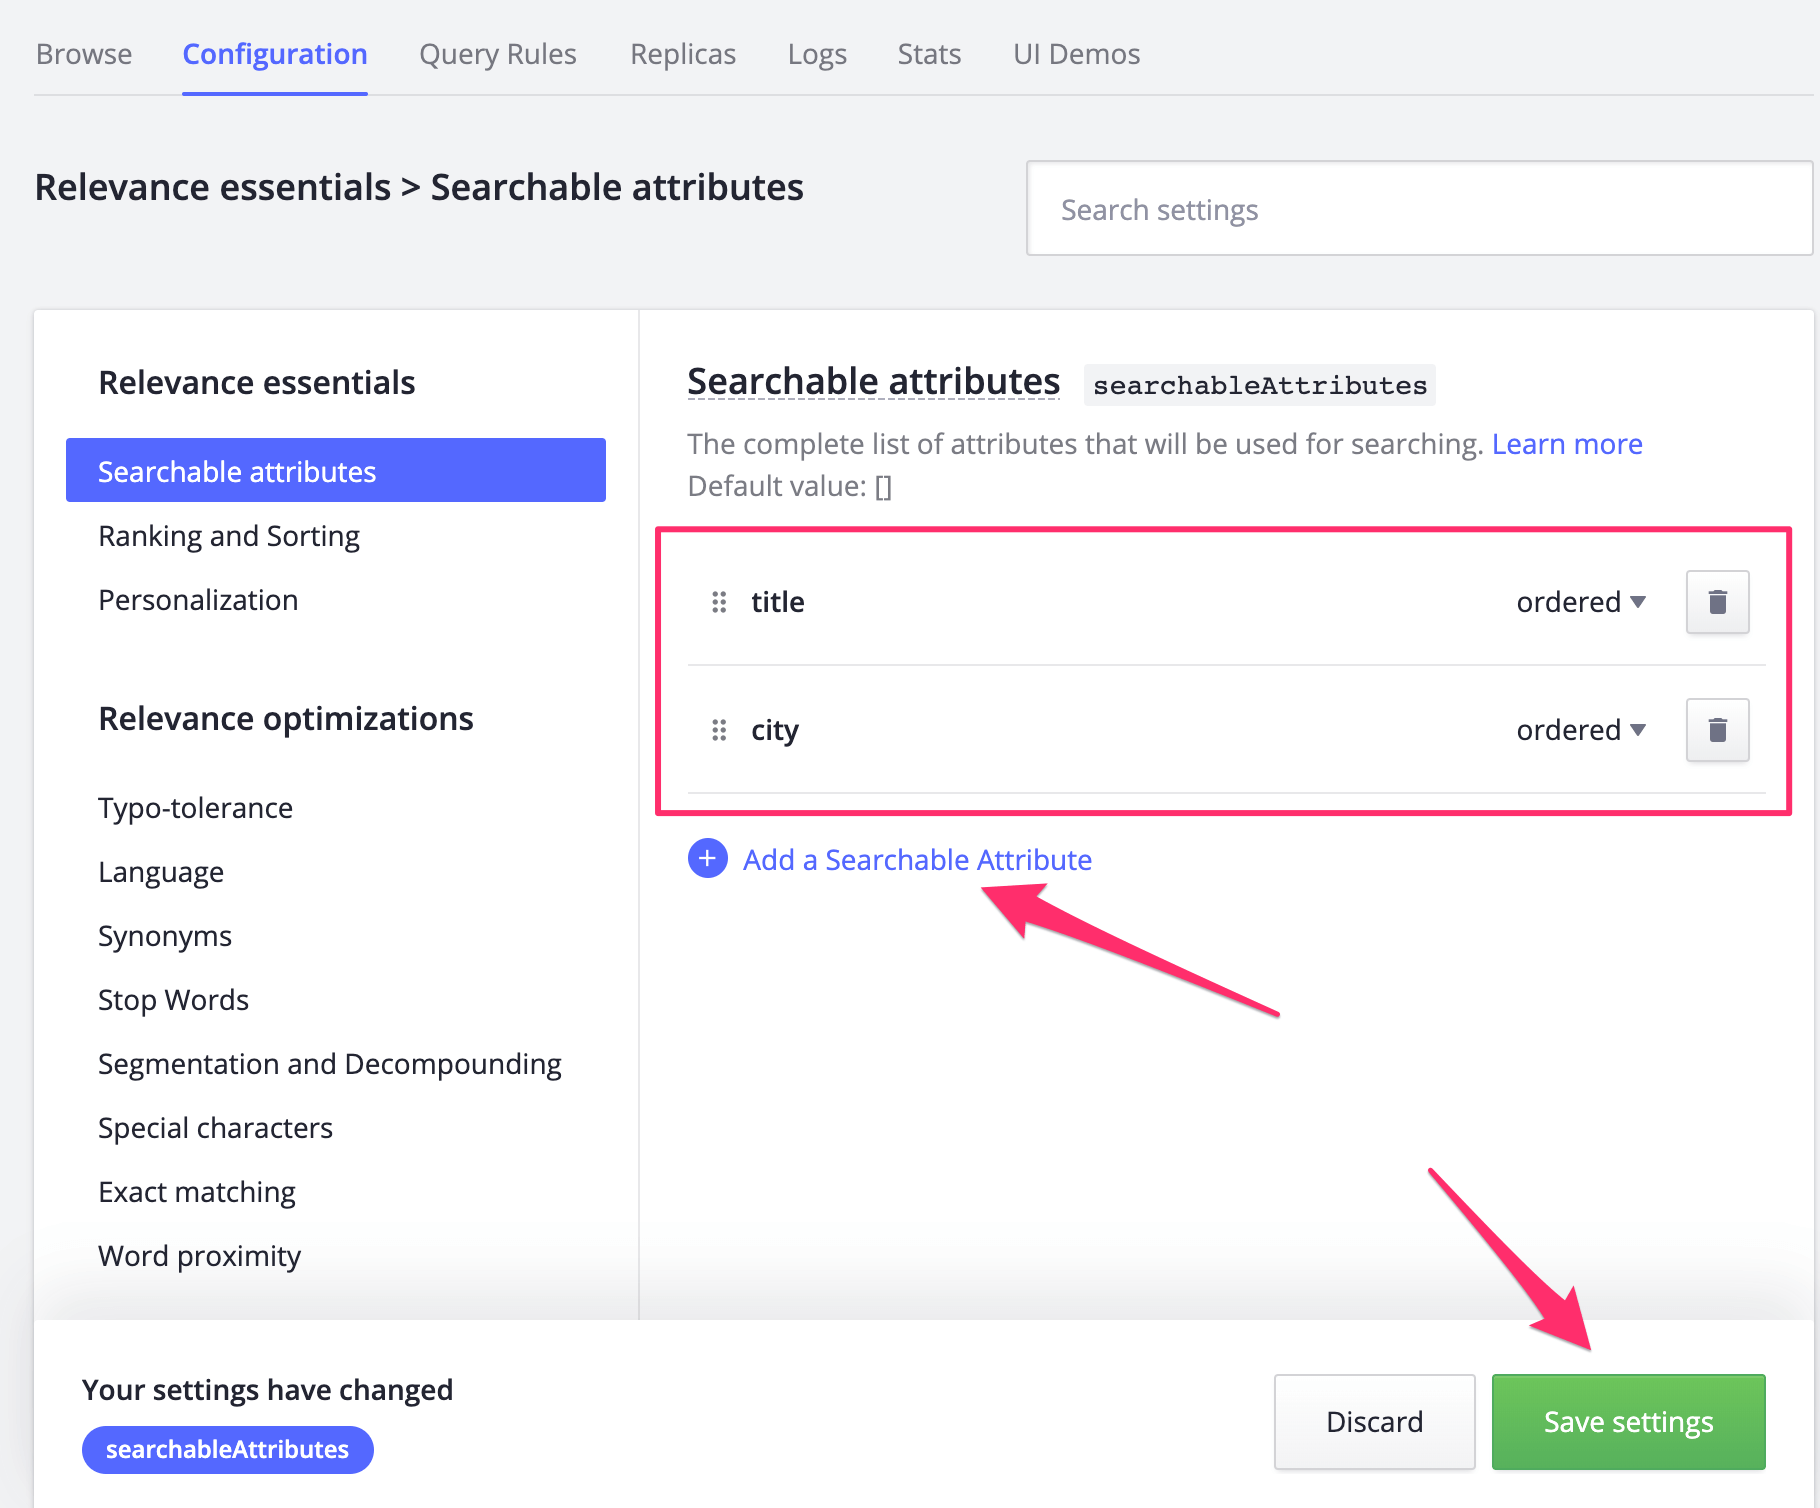
An index is a collection of records with some possible operations like search, filter and sort. It's more or less a database table.

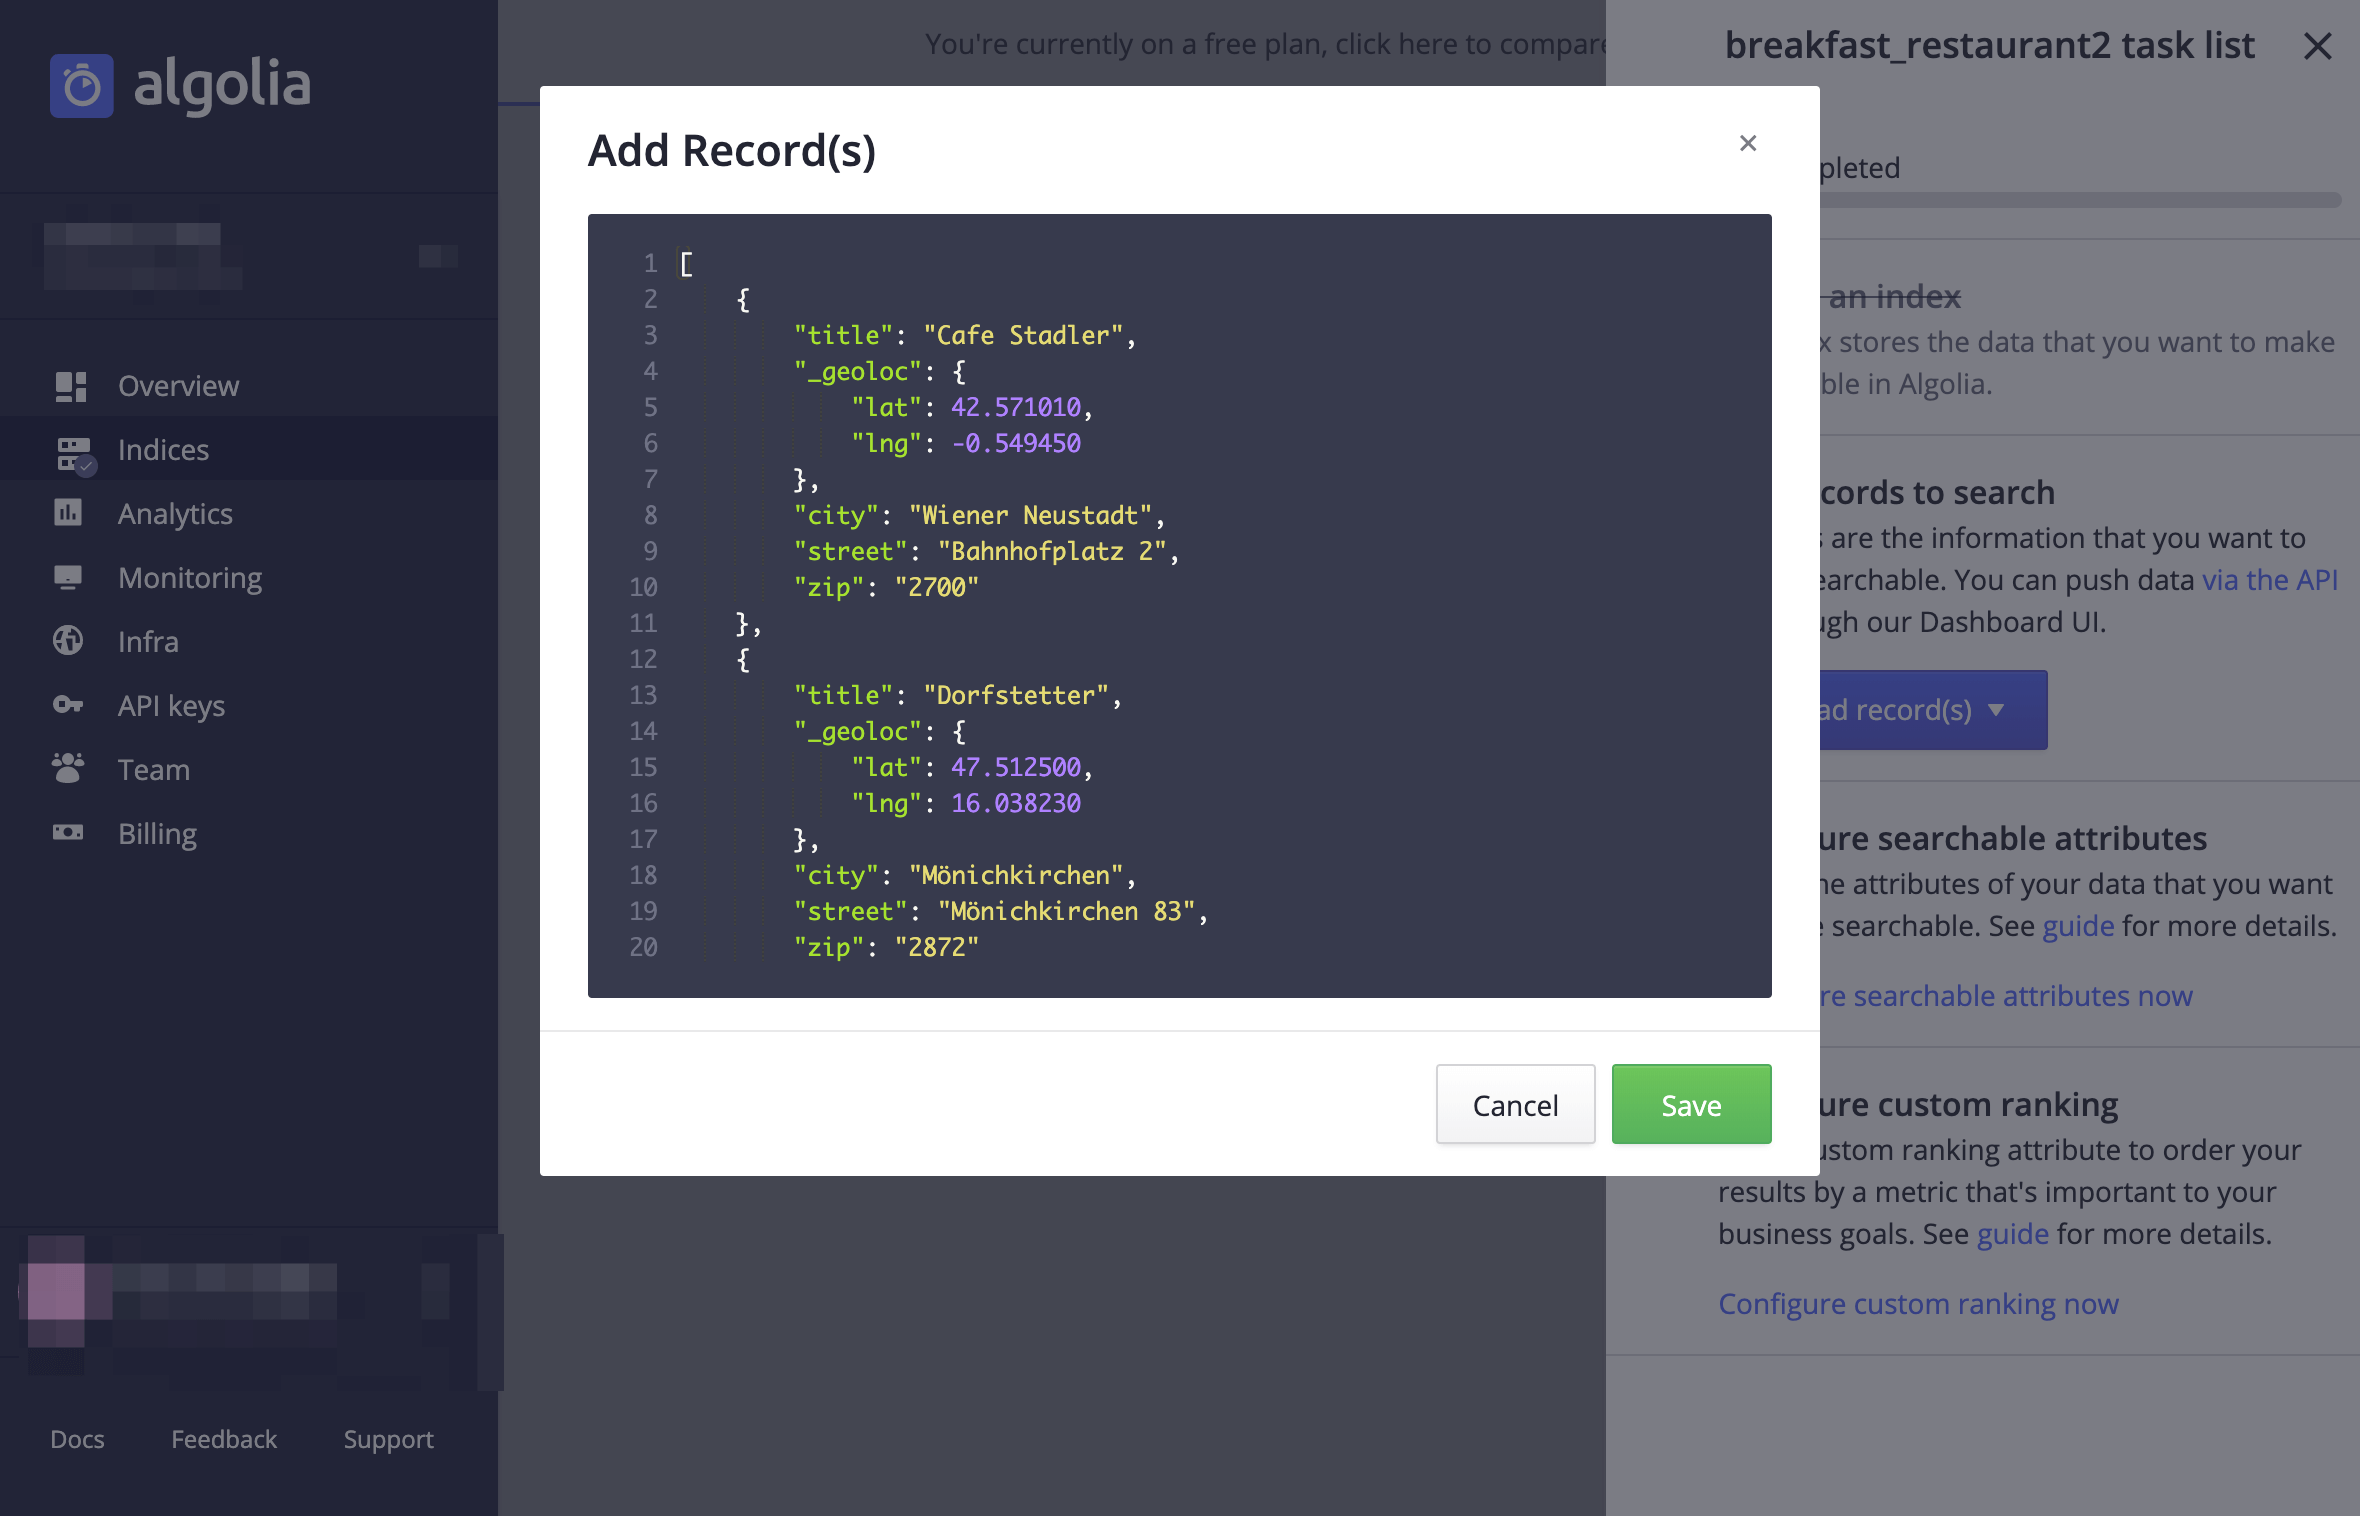
4.2 Import test data
Here is some testdata I will use.
[
    {
        "title": "Cafe Stadler",
        "_geoloc": {
            "lat": 42.571010,
            "lng": -0.549450
        },
        "city": "Wiener Neustadt",
        "street": "Bahnhofplatz 2",
        "zip": "2700"
    },
    {
        "title": "Dorfstetter",
        "_geoloc": {
            "lat": 47.512500,
            "lng": 16.038230
        },
        "city": "Mönichkirchen",
        "street": "Mönichkirchen 83",
        "zip": "2872"
    },
    {
        "title": "Eis Greissler Manufaktur",
        "_geoloc": {
            "lat": 47.532612,
            "lng": 16.154989
        },
        "city": "Krumbach",
        "street": "Königsegg 25",
        "zip": "2872"
    }
]
To use algolia as datastore for our breakfast locator we will need to setup our datastore, the index first.
There is a package around where you can import your .csv records easily. In case you need it:
https://github.com/algolia/algolia-csv-js
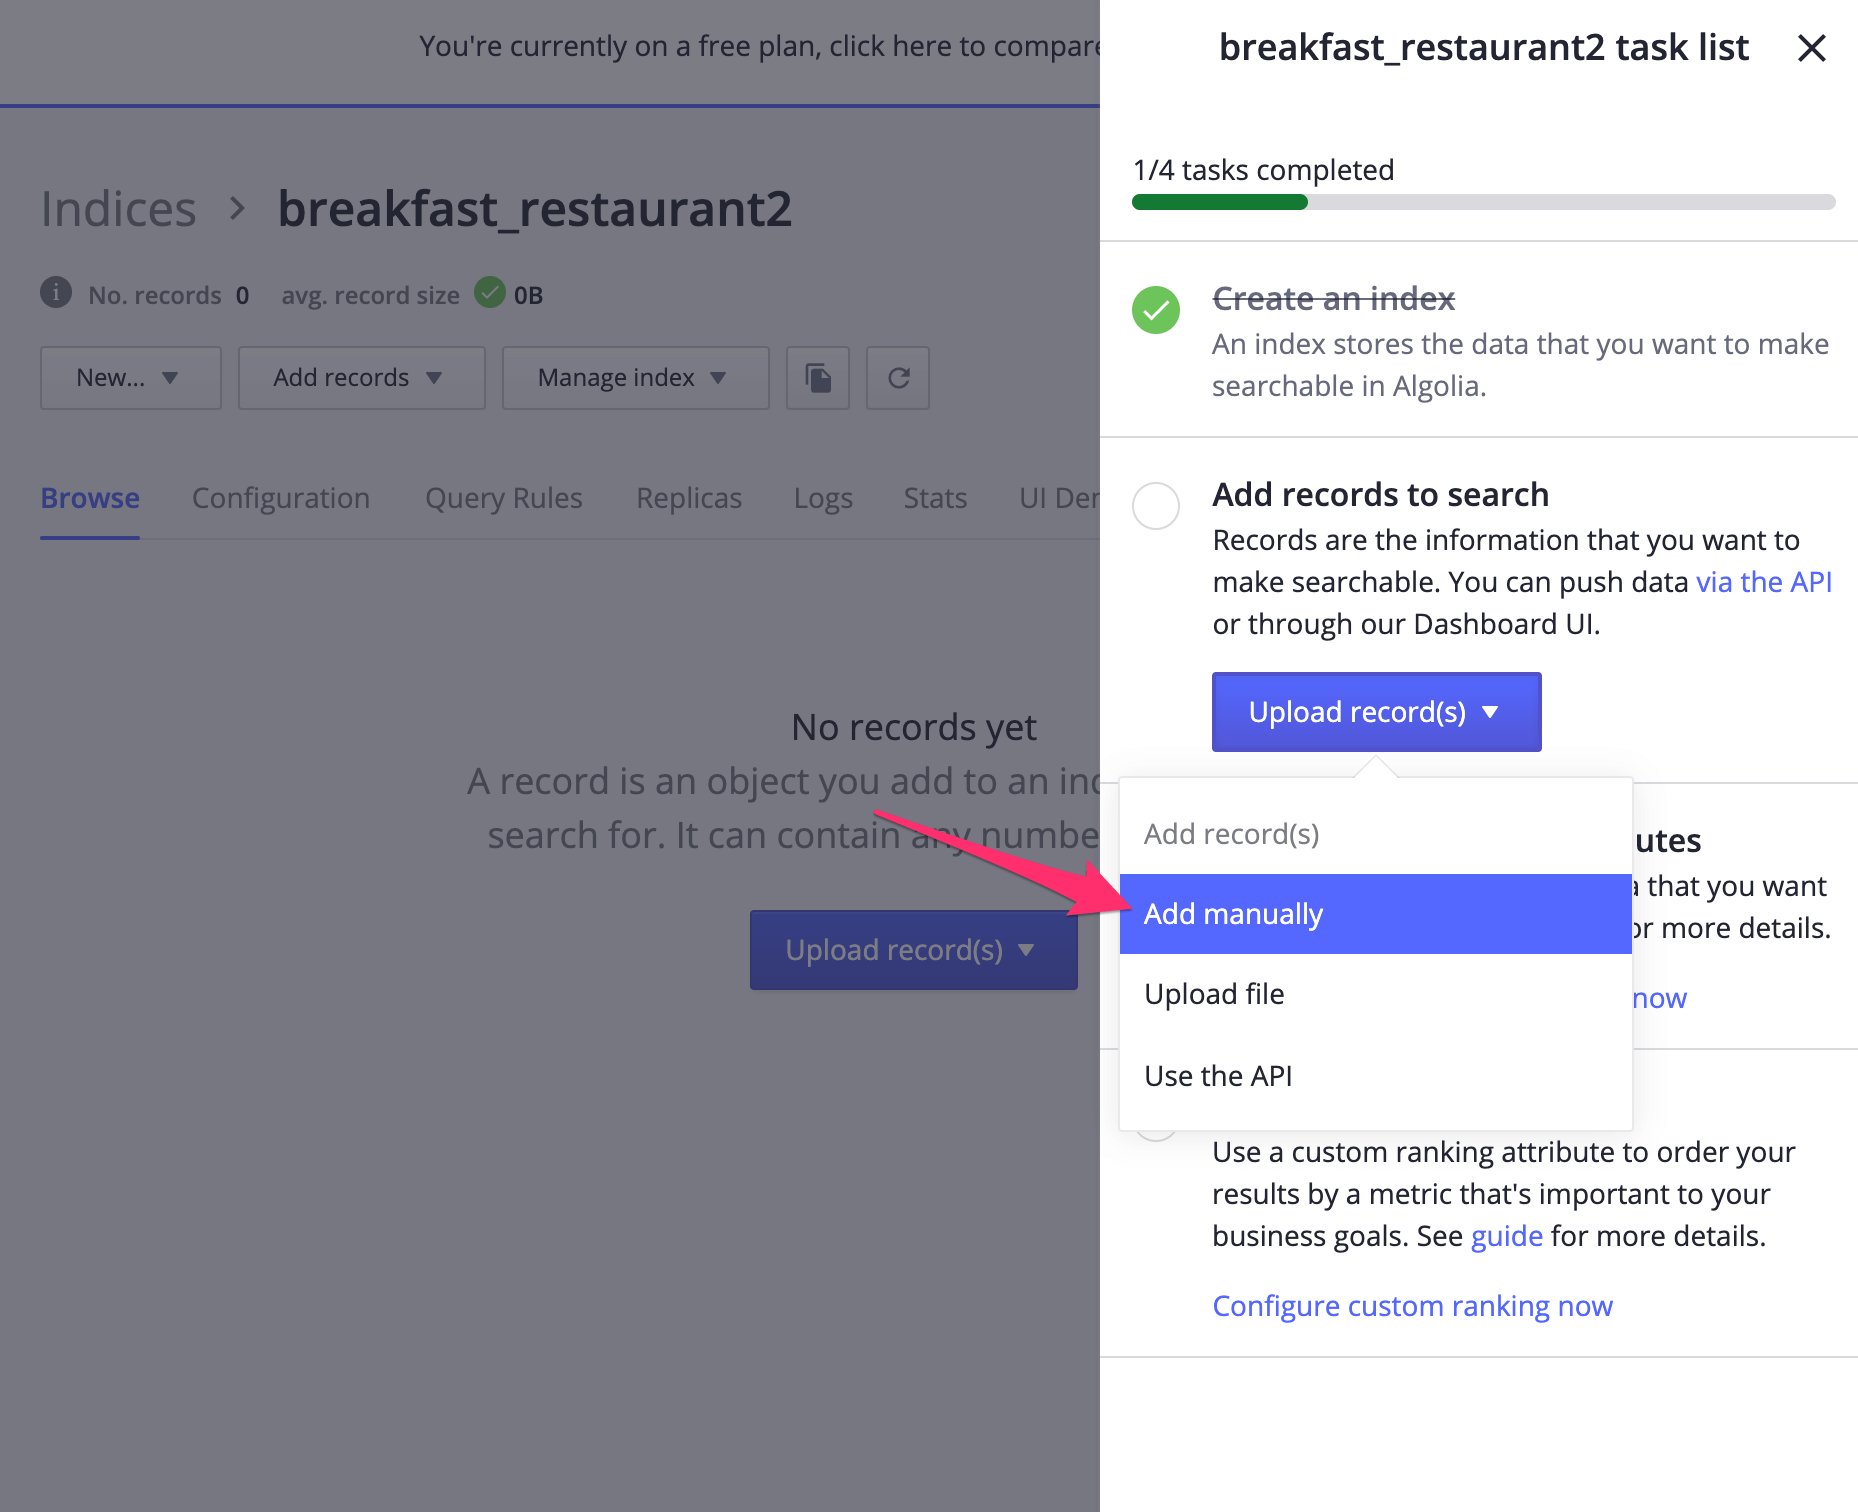
Login to your algolia account and switch to the the indices page. Click on the New.. button and choose Index. Type breakfast_restaurant for the index name.
After you have created your index click on the tasks completed button to setup the index.


4.3 Get an algolia search api key
We need to connect and authorize our application to use it with algolia search. You can find your api key in the algolia dashboard.

5. Use nuxt with algolia instantsearch
Now we can proceed to build our frontend. To use algolia services we need to install some additional libraries.
yarn add algoliasearch vue-instantsearch instantsearch5.1. Let nuxt communicate with algolia
Here are the steps
- Define
constantswith the necessaryapi_keyandapp_idfrom algolia search. Both of them are necessary to initializealgoliasearch. - We use
vue-instantsearchwithAisInstantSearch. This component handles the communication between our application and algolia search. We have to wrap everyInstantSearchwidgets inside this component. - You also need the
index-namewhich you have created in the above step. This should be all to connect our application withalgolia search.
Where does <mj-map> come from? Sorry I skipped this step in the tutorial. I created a new component called components/Map.vue and put the leaflet map logic inside this component. If you confused about this please tell me in the comments.
<template>
  <div class="h-full w-full">
    <ais-instant-search
        :search-client="searchClient"
        :index-name="algoliaIndex"
    >
        <mj-map />
    </ais-instant-search>
  </div>
</template>
<script>
  import MjMap from "~/components/Map.vue";
  import algoliasearch from "algoliasearch/lite";
  import { AisInstantSearch } from "vue-instantsearch";

  const ALGOLIA_APP_ID = "<insert-your-app-id>";
  const ALGOLIA_SEARCH_ONLY_API_KEY = "<insert-your-api-key>";
  const ALGOLIA_INDEX_NAME = "breakfast_restaurant";

  const algoliaClient = algoliasearch(
    ALGOLIA_APP_ID,
    ALGOLIA_SEARCH_ONLY_API_KEY
  );

  export default {
    components: {
      MjMap,
      AisInstantSearch
    },
    data() {
        return {
            algoliaIndex: ALGOLIA_INDEX_NAME,
            searchClient: algoliaClient
        }
    }
  };
</script>
5.2 Place markers from your algolia index
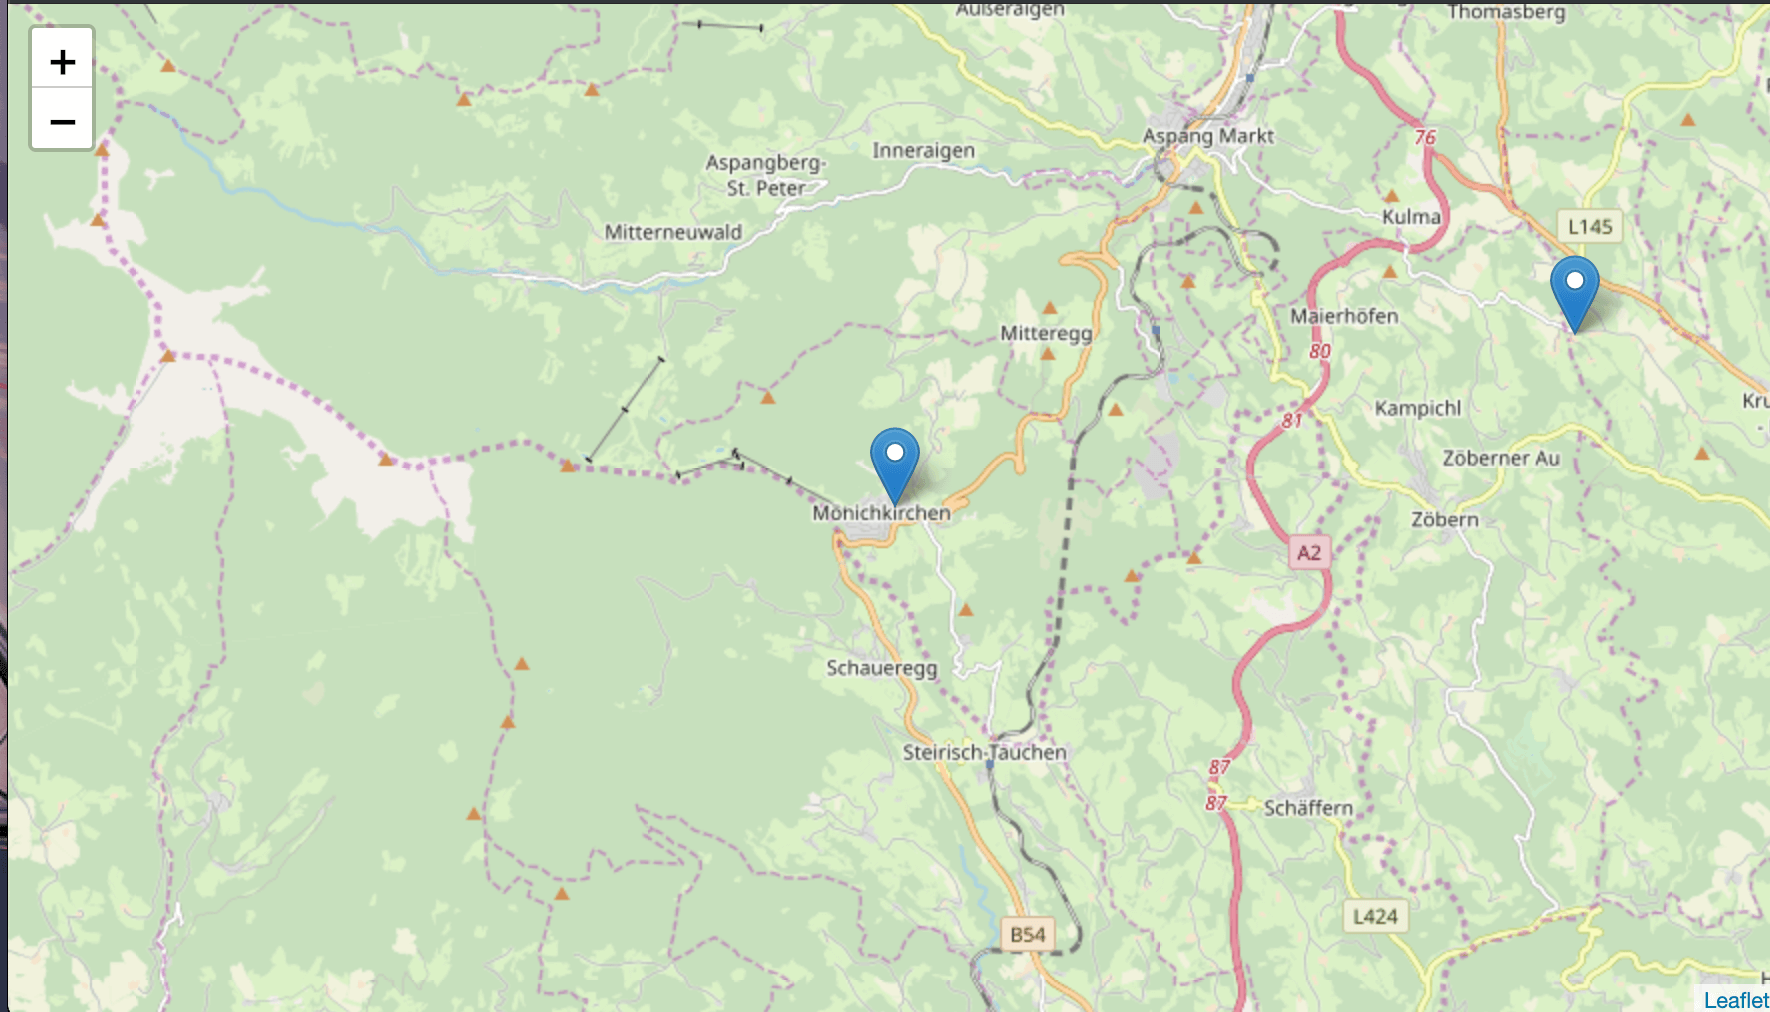
The next step is to replace the test marker positions with the _geoloc object from algolia. To make this happen we need to adjust the components/Map.vue component.
I need to explain one step a bit more: Since we're wrapping all our components inside the AisInstantSearch component we can make use of the connectGeoSearch connector. That means you don't need to fetch your algolia data manually with $.axios or something else. To achieve this step you have to do the following:
<script>
import { createWidgetMixin } from 'vue-instantsearch';
import { connectGeoSearch } from 'instantsearch.js/es/connectors';

export default {
  mixins: [createWidgetMixin({ connector: connectGeoSearch })],
};
</script>
With this code snippet a state.items object gets exposed to the component which gets filled with your records from algolia index. Honestly I was really confused in the first place how this works but in the end "it just works".
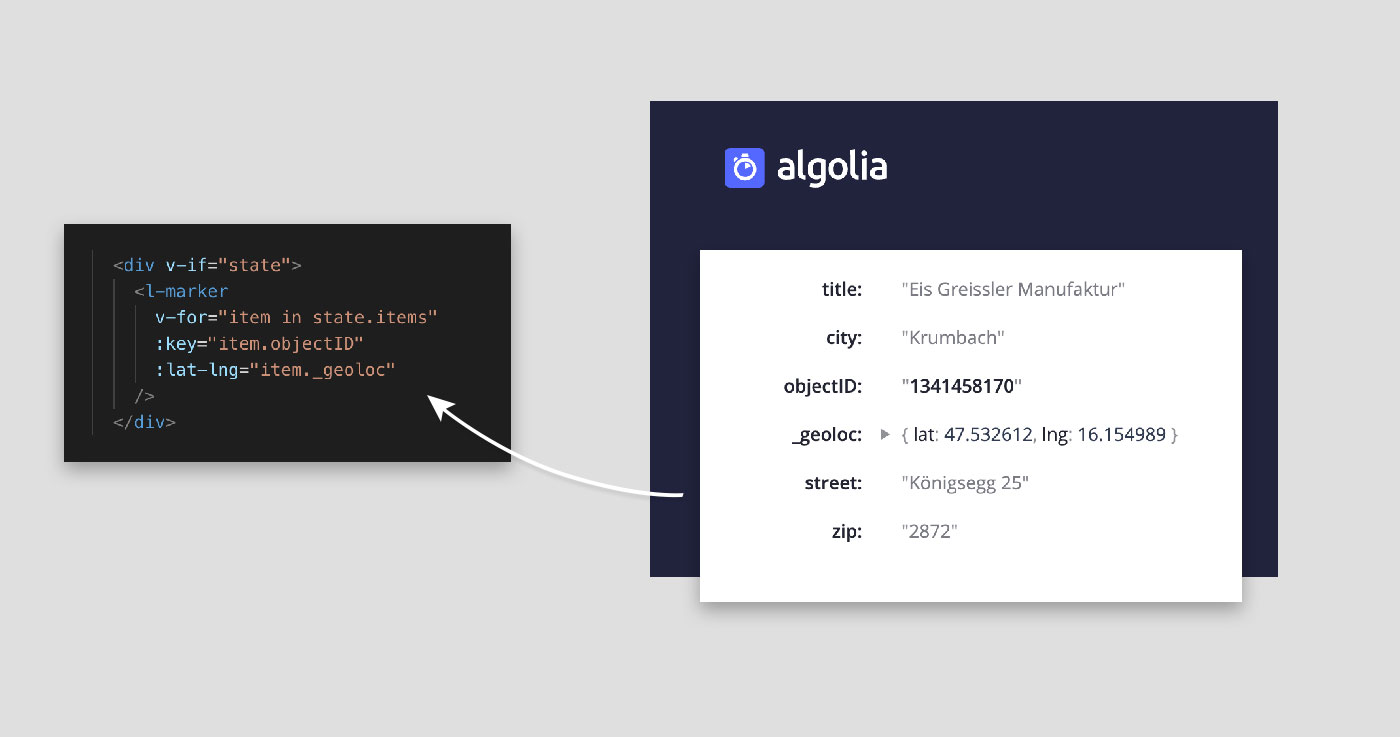
Ok here is my update to Map.vue code.
- Open
components/Map.vue
<template>
  <l-map
    class="min-h-screen z-10"
    :zoom="zoom"
    :center="center"
    :options="{ zoomControl: true }"
  >
    <l-tile-layer :url="url" />
    <div v-if="state">
      <l-marker
        v-for="item in state.items"
        :key="item.objectID"
        :lat-lng="item._geoloc"
      />
    </div>
  </l-map>
</template>
<script>
import { LMap, LTileLayer, LMarker } from "vue2-leaflet";
import { createWidgetMixin } from "vue-instantsearch";
import { connectGeoSearch } from "instantsearch.js/es/connectors";

export default {
  name: "MjMap",
  components: {
    LMap,
    LTileLayer,
    LMarker
  },
  mixins: [createWidgetMixin({ connector: connectGeoSearch })],
  data() {
    return {
      url: "http://{s}.tile.osm.org/{z}/{x}/{y}.png",
      zoom: 12,
      center: [47.5125, 16.03823]
    };
  }
};
</script>
Whats next?
With this setup we can now implement restaurant search and many more. This is something I will adding in the next days. Stay tuned.
Source on github
You can find the source on github here
Thanks for reading.